tabs

es about us es contact es archive es challenge es we love 9 es recipes es pintests es links
Showing posts with label us. Show all posts

Friday, 28 November 2014

Styling Challenge: Hotel Chocolat Christmas Range

*Hotel Chocolat products c/o Hotel Chocolat available HERE.


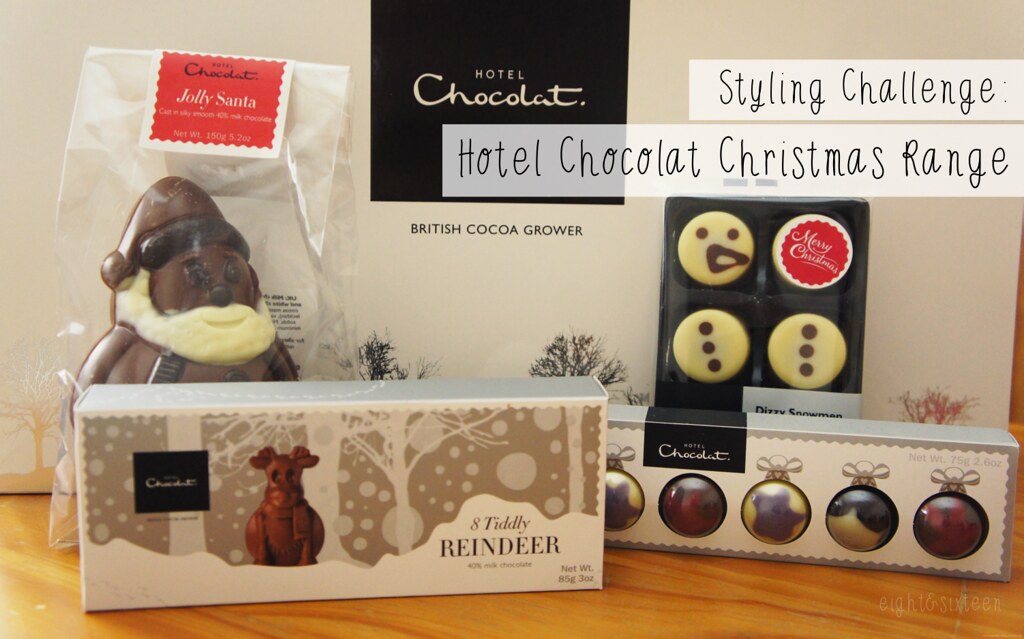
Welcome to another challenge post! This time we're showcasing some festive treats from British company Hotel Chocolat and will each be sharing how we would style the selection of products shown above! All of the products here are gluten free which is great for the both of us, and they would all make perfect little gifts for your friends and family.

Here's how we styled them...

hotel chocolat styling challenge
hotel chocolat styling challenge hotel chocolat styling challenge
hotel chocolat styling challenge

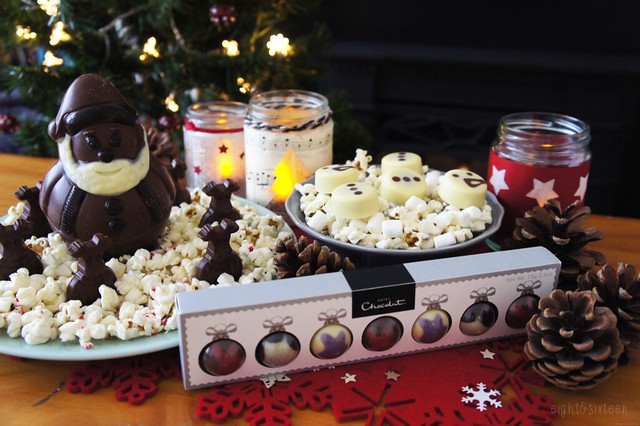
As many people catch up with friends and family over the holiday season I decided to style the products for a festive get together, sharing a few ideas of how to display them on a coffee table as treats for you and your guests to enjoy. All perfect for a little bit of luxury this Christmas, the products are great for creating an eyecatching display that your guests won't be able to resist!

For the Dizzy Snowmen I chose to create a snowy backdrop filling a bowl with sweet popcorn, white marshmallows and edible silver balls, placing the cute (and delicious!) praline treats on top. Similarly I also used popcorn to showcase the Jolly Santa and milk chocolate Tiddly Reindeer, this time adding in some crushed candy canes for a little pop of colour and peppermint flavour which compliments the chocolate well.

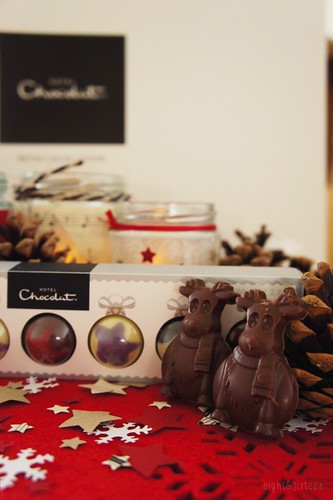
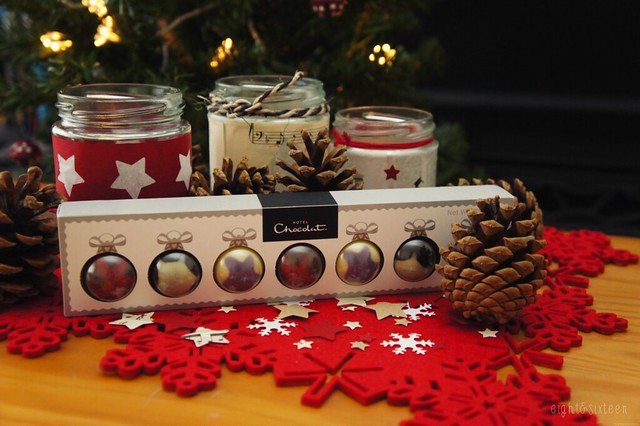
I particularly loved the chic festive packaging of the truffles, designed to look like miniature baubles,  and opted to leave them in the box surrounded by upcycled tea light jars and some homemade confetti created using craft punches. This year I've collected some woodland themed decorations for our tree and am trying to create more of a nature-inspired festive look so a few pine cones also made their way into the display! - Erin


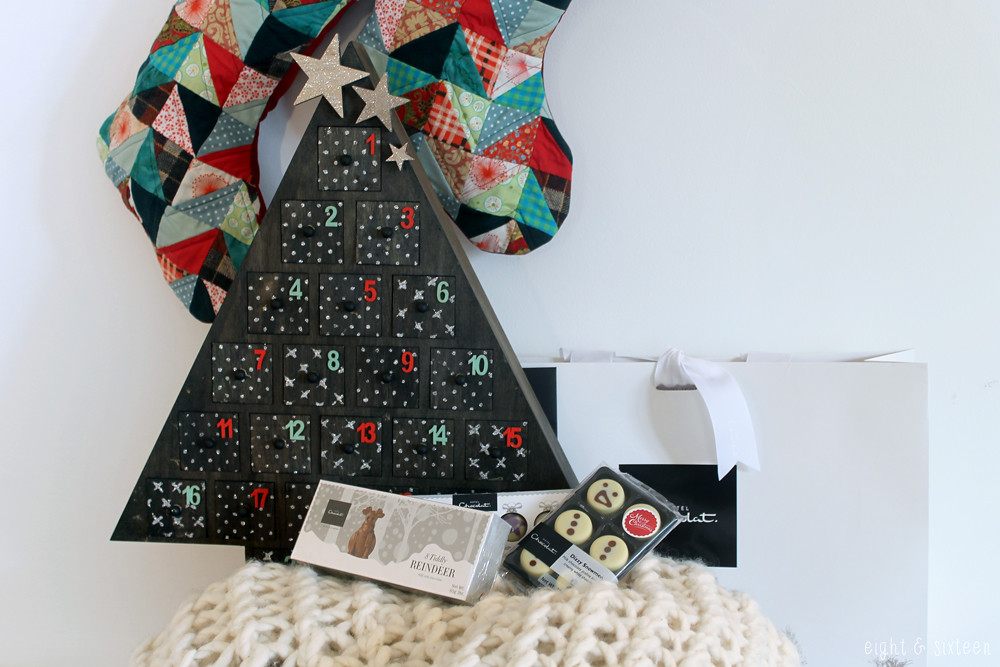
To keep the festivities going throughout December, I decided to use the products as gifts to fill an advent calendar. Ever since I finished my advent calendar a few weeks ago, I've been wondering what sort of treats to fill it with come December, and these goodies have proved to be a great match!

With very little space for a big Christmas tree, the calendar became the centrepiece for me to show off the beautifully packaged chocolates and I filled the drawers with mixtures of the Tiddly Reindeer, truffle filled Chocolate Baubles and praline filled Dizzy Snowmen.
The presentation of the Chocolate Baubles is so cute and it felt a bit wrong to remove them from their packaging, but they are the perfect size for a little daily treat. I love that it's been possible to use the chocolates in this way - being able to divide them out to fill a calendar is a great way to make them last, as tempting as it might be to scoff them all at once!
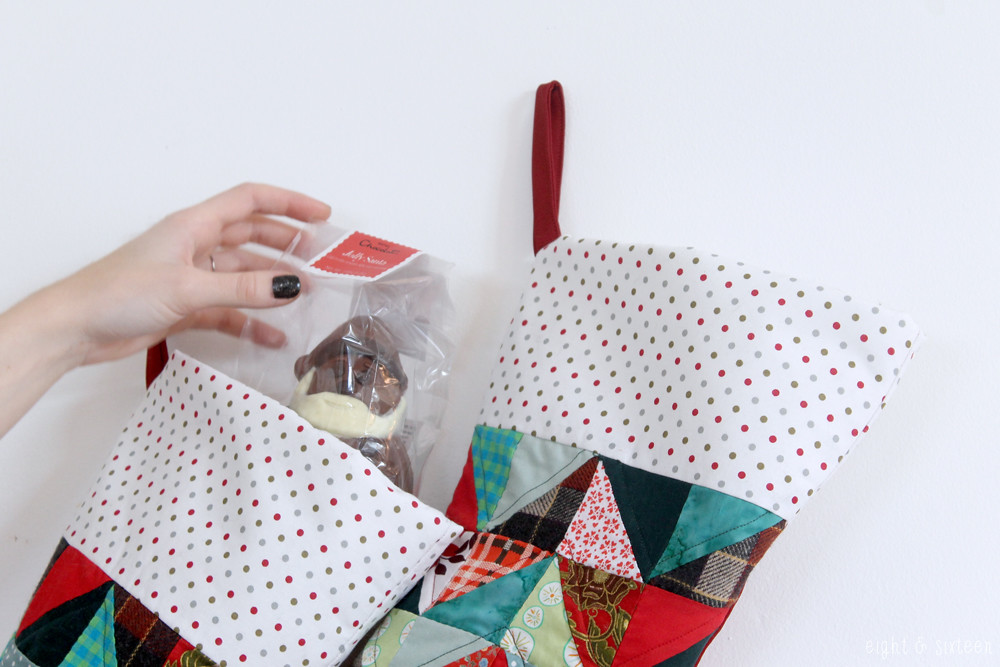
I then hung up my hand made Christmas stockings to finish off the scene, and popped Jolly Santa into the top of one as a little sneak peek to get the festive spirits in full swing.

Hotel Chocolat really do know how to present their products, and it's something that has always drawn them to me. As soon as you see a glimpse of their logo or packaging under the tree or in a stocking, you know you're in for a real treat. - Skye


Have you tried anything from the Hotel Chocolat Christmas range yet? We'd love to know what your top picks are!

Erin & Skye

Monday, 24 November 2014

5 Simple Gift Wrap Ideas!

With Christmas fast approaching we thought it might be nice to put together another '5 Things' style post, this time sharing some of our favourite gift wrap ideas! 

snowflake gift wrap idea

Hama Bead Snowflakes
This Pinterest inspired idea is an easy way to add a little something extra to simple brown paper and twine style gift wrap. Depending on what size peg boards and beads you have you can create lots of different snowflake designs, perhaps even a unique one for each gift! - E

origami bows

Origami Bows
Origami bows like these are perfect for gift wrap as you can use any paper you like to make them - wrapping paper, scrapbooking sheets, even upcycled books and magazines. To create the bows pictured above I followed this great tutorial which has step-by-step photographs, once you get the hang of the technique you'll be able to whip up a whole batch in no time! - E

washi tape transfer

Washi Tape Transfers 
This awesome idea found on A Girl And A Glue Gun is an easy way to add text to wrapped gifts or cards. Simply type out your text, print onto a sheet of paper then place a strip of washi tape over the top lightly. When you peel away the tape the text will come with it! (Fonts used: American Typewriter & KG Bless Your Heart) - E


Paper Snowflake
The great thing about making paper snowflakes for your wrapping paper is that they will all be completely unique! I followed this great tutorial to get started, but you can personalise them any way you want. Use contrasting coloured paper to your main wrapping paper, or recycle magazines, and then either glue in place or tuck underneath some string. - S


Personalised Washi Tape Flags
This is such a simple but effective way to personalise your wrapping. Simply fold a strip of washi tape in half around your string, cut a triangle out from the end to create the flag shape and then write or stamp on the name. You don't have to stick to names either, why not write more personalised messages, or keep it simple with just initials.- S


We'd love to hear from you if you give these DIY's a go - use the hash tag #eightandsixteen to share your photos with us! 
Erin & Skye

Monday, 17 November 2014

We Love... The Hunger Games

we love hunger games

One of our shared favourite book & film series has to be The Hunger Games, so of course we're both very excited about the release of Mockingjay Part 1 this week! To celebrate we have planned a couple of Hunger Games inspired projects for you and will be sharing them over the rest of the week.

If you've created any Hunger Games inspired crafts we would love to see them - leave us a comment or use the hash tag #eightandsixteen to share them with us! 

May the odds be ever in your favour...

Skye & Erin

Monday, 3 November 2014

Tea Towel Challenge!

tea towel challenge

This week we're taking on another challenge, this time the idea is to upcycle this cute and colourful fruit print tea towel from Tiger into something completely different!

We each have the exact same tea towel and have been working away in secret on our projects ready for the big reveals. Be sure to check back on Wednesday & Friday to see the results!

In the meantime we'd love to hear your ideas, what would you turn this colourful tea towel into?

Skye & Erin


Monday, 20 October 2014

Pumpkin Decorating Challenge Week!

diy-challenge-pumpkins

What would an October full of Halloween inspired projects be without pumpkins? This week we'll be introducing our new 'challenge week' format and will each be sharing our own pumpkin decorating ideas. Look out for Erin's finished pumpkins on Wednesday followed by Skye's on Friday!

We'd love to hear how you're planning to decorate yours this year - use the hash tag #eightandsixteen to share your photos with us!

Skye & Erin

Monday, 15 September 2014

DIY's With Speedy Stamps


Today we have a few DIY ideas to share with you that use our personalised Speedy Stamps stamp (you can see our full review here).

Skye's DIY

For my Speedy Stamps DIY, I decided to make some e&s business cards - a perfect way to show off our logo and the stamp.
I wanted the design of the cards to be simple and let the logo become the main focal point, so simply added different washi tapes in a variety of ways across the cards.
I think that the overall effect is very reflective of the e&s blog - minimalistic but a little playful :)

Erin's DIY
diy business card holder

To compliment Skye's project I decided to use my stamp to make a personalised business card case perfect for protecting your new cards when you're carrying them around in your bag! Not only is this a handy little case to make but it's also a quick and easy project, here's how I did it...

To create the case I cut three 4.5 x 6.5" rectangles, one from felt, one from paper and one from sticky back plastic. I stamped our Eight & Sixteen logo onto the paper before placing it face down onto the sheet of sticky back plastic to create a protective layer for the outside of the case.

I then used a craft glue to stick the piece of felt onto the reverse side of the paper, folded into a case shape and used my sewing machine to stitch together the sides turning it into a pouch style case!


These are just two DIY project ideas that are great for custom stamps - what would you make with yours?

We'd love to hear from you if you give these DIY's a go - use the hash tag #eightandsixteen to share your photos with us! 
 
Erin & Skye

Friday, 12 September 2014

5 Ways To Upcycle Tin Cans

5 ways to upcycle tin cans

Today we have another bunch of upcycle projects for you try out, this time they've all been made using tin cans!

tin can pincushion upcycle

Pin Cushion
Take a square of fabric, place some wadding in the centre and wrap to create a shape that fits into the top of your can. Decorate the can with pretty paper or spray paint then glue the fabric cushion into the top! - E


Planter
You can use small half sized tin cans or full sized ones to use as planters depending on the size of your plants. You can of course cover the can in washi tape or craft paper, but I love the contrast of the metal against the greenery. - S


Tealight Holder
Grouped together, tin cans as tealight holders can be super effective. To make, fill an empty tin can with water and leave to freeze. Then using a hammer and a nail, punch your chosen design onto the can. - S

chalkboard tins upcycle storage

Chalkboard Storage Pots
To create these cute pots cover the cans with two layers of chalkboard paint then use thick cardboard to create lids. Glue on large beads or wooden embellishments to use as handles and decorate or label the cans with chalk. - E

tin can garden mobile upcycle diy

Garden Mobile
Carefully drill holes into sides of your can close to what would have been the top of it. Simply decorate using paint, sequins etc then add on lengths of ribbon, strings of beads, found objects such as twigs or anything else you'd like to turn it into a mobile. To hang drill a hole in the base of the tin and add on some twine or wire. - E

We'd love to hear from you if you give these DIY's a go - use the hash tag #eightandsixteen to share your photos with us! 
Erin & Skye

Monday, 11 August 2014

5 Ways To Upcycle Cardboard Tubes

cardboard upcyles

We love a good upcycle project and hate to see simple materials with so much potential go to waste! So today we've teamed up to bring you five project ideas to turn unwanted cardboard tubes into something a little more exciting...

toilet-tube-stamped-paper

1. Stamp
This is a super easy way to create your own printed wrapping paper. Simply take your cardboard tube and flatten it in half, then open out and push one fold in to create a heart shape. Then just dip the end of the tube into your paint and stamp away. - S

upcycle cardboard tube pillow boxes

2. Pillow Boxes
Instead of making pillow boxes and simply covering them with wrapping paper I took to Pinterest to see if I could find any fun decoration ideas and stumbled across some animal designs. I loved how the shape of the pillow box lends itself to being an owl. I used a circle punch and some scrap papers to decorate the body and cut wings from the scraps of cardboard - E

cable-tidy

3. Cable Tidy
There are tons of great ways to keep all of your cables organised, and colour coded cardboard tubes is a really easy option. Cover as many tubes as needed in your favourite washi tapes or craft papers, and then pick a cable for each. That way the cables are out of the way, and you'll know exactly which one to reach for depending on its brightly covered cover. - S

hair cuff diy cardboard tube

4. Hair Cuffs
Another Pinterest inspired idea was this simple to make hair cuff that sits over and covers your regular hairband for a more fun look. To create it I cut a small section of a cardboard tube, used Mod Podge to cover it with a scrap of fabric and once dry cut a slit into it so it could easily be put in place on the ponytail and voilĂ , a new accessory in minutes! - E


seed planters

5. Seed Planters
To make the planters, cut off 1/4 of a tube, fold the remaining tube in half, and then half again. Open the tube out again and then using a pair of scissors snip about 1" into each of the folds. Fold these flaps one on top of the other and fold the remaining one underneath the first to secure, and that's the bottom of your planter. The great thing about using cardboard tubes is plant seeders is that once your plants are ready to be moved into bigger pots, the cardboard can go straight in with them as it will just breakdown into the soil. - S


We'd love to hear from you if you give these DIY's a go - use the hash tag #eightandsixteen to share your photos with us!


Monday, 28 July 2014

We Love... Harry Potter

we love harry potter

One of the first things we discovered we had in common was a love of Harry Potter and of course, we're not the only ones. Earlier this month marked three years since the release of final movie adaptaion The Deathly Hallows Part 2 so, what better subject for our next We Love... series?

Over the next four weeks, amongst our usual variety of posts, we'll be sharing some Harry Potter inspired DIYs perfect for our fellow fans to celebrate this amazing series!

Don't forget to check back on Wednesday for the first tutorial! :)

Erin & Skye

Monday, 21 July 2014

DIY Challenge: Storage Bowls

bowls challenge title

Today we have our second DIY challenge - storage bowls! We both liked the idea of creating bowls for storing our craft supplies, and decided to take on different materials to create them: fabric and paper mache.

Here's what we came up with....

Erin's Storage Bowl
diy challenge fabric bowls

For my project I chose to make a bowl using fabric. I'd already seen a few of these around on Pinterest and thought it looked like a great idea! To create it I covered a china bowl with clingfilm (to use for shaping), cut strips of fabric, coated them in a mixture of Mod Podge and water and layered them onto the bowl. I wanted the inside to be floral so I layered these strips on first face down, then added a layer of blue strips for the outside of the bowl and left to dry overnight. After removing it from the china bowl and peeling away the clingfilm the last step was to trim the edges and cover them with a strip of bias binding for a neater finish.

To be honest I'm not that pleased with how my bowl project turned out. Although the method works well I don't think the fabrics that I chose gave the best results. If I were to have a second attempt at this project I would definitely stay away from fabrics with white backgrounds. As the Mod Podge/water mixture means that the fabrics dry to a slightly transparent finish you can see the colour of the second fabric through any white sections. Perhaps two layers of each fabric would also give a nicer finish however it took long enough to dry with just the two layers!

Skye's Storage Bowls

Making paper mache bowls definitely felt like a trip down memory lane for me; Art Attack anyone?! Although this method is pretty easy, it does take a long time as there is a lot of waiting around for glue to dry.

I used 4 different shaped and sized balloons and set to work covering them in strips of newspaper and PVA glue (If you have some old bowls or glasses, these come in handy to prop your balloons in whilst waiting for the layers to dry). In the end I did three newspaper layers, and then added a final kitchen towel layer which gives the textured finish.
I also added bases to the bowls by cutting a cardboard tube into 4 pieces, and attaching it to the bottom of the bowls with more newspaper and PVA glue.
Once the paper mache was completely dry, I burst the balloons and trimmed the top edges to neaten. Then I simply painted each one and added a coat of varnish once the paint had dried to seal everything.

I definitely had fun making these bowls, but I think if I made them again I would be more patient and add a few more layers of paper mache for strength. I have filled each bowl with various supplies, but they are a little flimsy and I think that some extra strength would help them to stand the test of time.

We'd love to hear from you if you try out this DIY project - use the hashtag #eightandsixteen to share your photos with us!

Erin & Skye

email | twitter | facebook | pinterest | bloglovin'

Monday, 2 June 2014

Welcome To Eight & Sixteen!


e&s-blog-button-2

Over the last few years Erin of e-elise etc. and Skye of even artichokes have hearts have become close friends, sharing a love of all things blogging, crafty and Harry Potter related.
Through endless emails, tweets and letters, we realised how many shared aspirations we have, and the idea of working together first came about after a series of Halloween blog challenges in 2012.

The idea of a shared blog bounced back and forth between us for a while; at first we weren’t sure if we could make it work as we live over 80 miles apart but we decided that we weren’t going to let that stop us and so Eight & Sixteen was born!

To kick off we will be blogging on a Monday, Wednesday, Friday schedule where you can expect to see posts featuring crafts, recipes and challenges with a new DIY tutorial every Wednesday.

The idea behind the blog is all about creating and sharing and we hope that over time Eight & Sixteen will become a community. This isn't just about us sharing our projects and ideas, our social media links will be included in every post and we will be using the hashtag #eightandsixteen where you can get involved too by sharing your creations with us!
From there, we'd love to start doing feature posts showcasing the creations that you share with us; we can't wait to see what you come up with and share your creative talent!

Erin & Skye

Related Posts Plugin for WordPress, Blogger...