tabs

es about us es contact es archive es challenge es we love 9 es recipes es pintests es links

Friday 31 October 2014

Sweet & Savoury Pumpkin Seeds


Happy Halloween everyone! We hope you have a perfectly spooky day whatever you are doing, and we hope you've enjoyed all of our Halloween posts here at Eight & Sixteen.

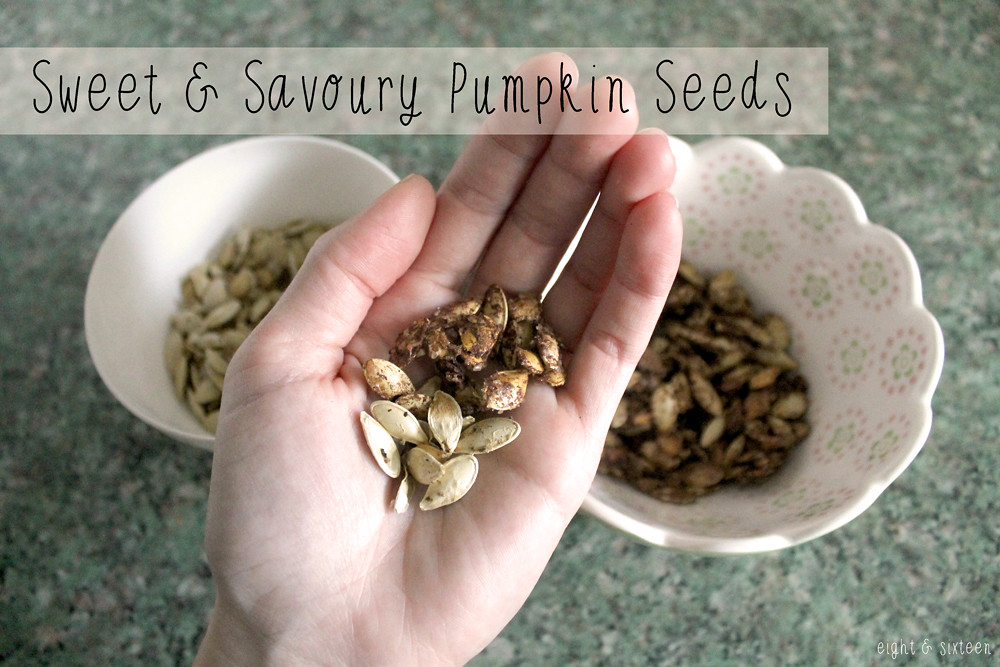
This recipe may not be spooky, but it is great for making the most out of your pumpkins! Toasted pumpkin seeds are a very yummy snack and can be flavoured in tons of ways.
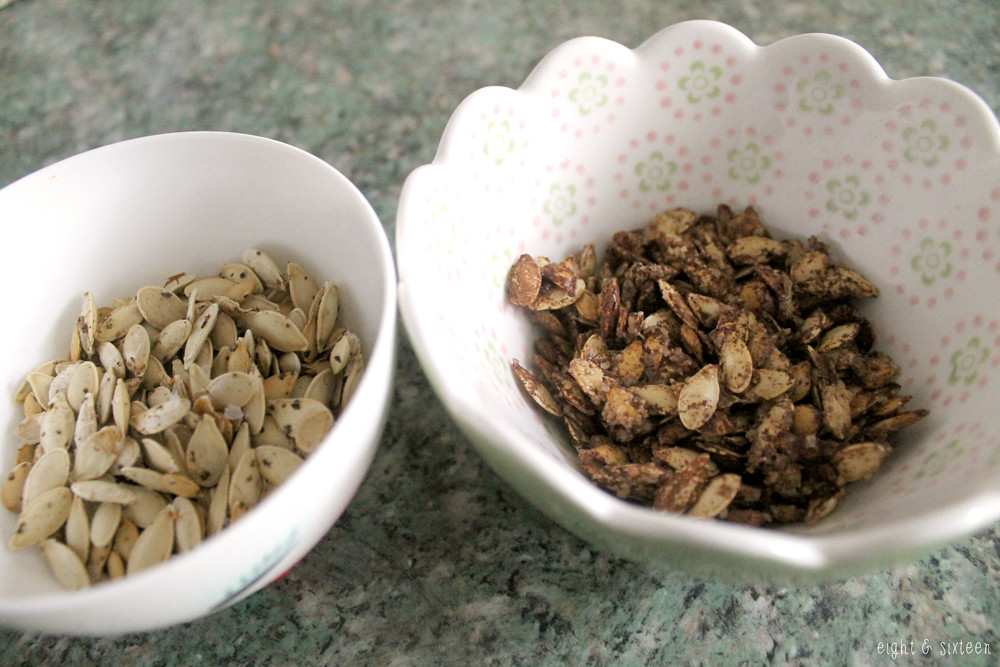
I've chosen a sweet and a savoury combination for my pumpkin seeds, and they were both super tasty.

Ingredients based on seeds from one large pumpkin:
Sweet:
• 1 teaspoon cinnamon
• 1 teaspoon light brown sugar
Savoury:
• 1 teaspoon salt
• 1 teaspoon pepper


First you'll need to scoop out the seeds from your pumpkin and rinse them thoroughly. Be sure to remove as much pumpkin flesh as possible. Place your seeds onto a tea towel and rub to dry them off.


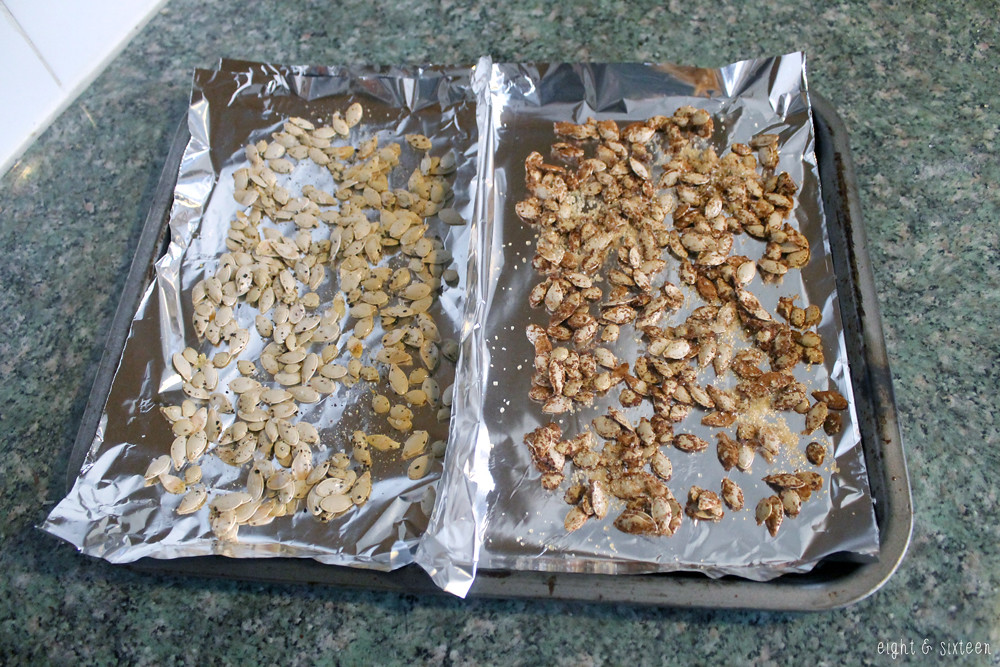
Place your seeds in a bowl, add your flavourings and mix well. Spread out evenly on a baking tray and bake for around 45 minutes at 150°c. Check every 15 minutes and mix the seeds around on the tray; if you don't do this (especially with the sweet variety) you'll find that the seeds stick to the tray.

Once baked, leave to cool and sprinkle a little more of your chosen flavourings on top if needed. Enjoy!


We'd love to hear from you if you give this recipe a go - use the hash tag #eightandsixteen to share your photos with us!

Skye


Wednesday 29 October 2014

DIY Simple Spider Decoration

diy simple spider decoration for halloween eightandsixteen diy simple spider decoration for halloween eightandsixteen

If you're looking for a quick and easy last minute Halloween project today's DIY could be perfect for you! This creepy spider garland is really simple to make, takes no time at all and is a great way to surprise your guests as they arrive.

To make your own you will need: clear beading thread, plastic spiders (I picked up a pack of 72 from Pound World) & a glue gun

Simply use a hot glue gun to apply a line of glue to the underside of the first spider and lay on your clear thread to secure it in place. Repeat this process until you reach the desired length & you're done!

As you can see I've chosen to display my spider decoration along a banister but you can also use them on doors, across fireplaces, on tabletops, windows - wherever you like!

diy simple spider decoration for halloween eightandsixteen

We'd love to hear from you if you try out this or any of our other DIY projects - use the hashtag #eightandsixteen to share your photos with us!

Erin

Friday 24 October 2014

Skye's Pumpkin Decorating Challenge Results


Pumpkin decorating without the mess of carving seems to be a popular approach for Halloween this year; Erin and I hadn't discussed our challenge plans but we clearly think along the same lines!
It's easy to see why this is a popular alternative to pumpkin carving as it's much easier and holds so many possibilities.

I wanted to try and create a more subtle Halloween theme with my pumpkins - think The Night Circus - and I also wanted to keep the budget to a minimum.


Luckily, I found these spray paints in Poundland, and they're great! I picked up silver, gold and copper but my local shop had black and white too. I'd definitely recommend them as spray paint is usually expensive, and these have held up brilliantly.
I fully sprayed a few of the pumpkins, and then also tried spraying just the top of one so that the paint dropped down the sides of the pumpkin for a splattered effect. I also tried a two tone combination of gold spray paint on the bottom half of one pumpkin, and then copper covering and dripping down the top. This didn't work quite as well as I'd hoped, but I think it has a Snow White poisoned apple vibe about it!


Once the spray paint had dried, I used black and white paints and a black sharpie marker to decorate the pumpkins. I went with bold polka dots, subtle dots on the dripping pumpkin, and then black and white stripes on the smaller pumpkins.

I love the look of these pumpkins clustered together, and even better when draped with my Ping Pong Ball Pumpkin Lights; they definitely make the flat feel ready for Halloween :)


We'd love to hear from you if you give this DIY a go - use the hash tag #eightandsixteen to share your photos with us!

Skye


Wednesday 22 October 2014

Erin's Pumpkin Decorating Challenge Results

halloween pumpkin decorating diy eightandsixteen

On Monday we introduced our Halloween inspired pumpkin decorating challenge and today I get to share my results! Right from the start I knew I wanted to try and use items that I already had in my craft stash to decorate the pumpkins, unintentionally making an extra challenge for myself. In the end I managed to do this using paints, felt, jewellery wire, Mod Podge and even nail art gems!

My pumpkin design was initially inspired by various Pins featuring bats and other animals attached onto the surface of plain coloured pumpkins to create a 3D effect. As someone who is terrible at pumpkin carving I loved the idea of being able to create something 3D without having to cut into the pumpkin at all.

Next came the idea to not just leave the pumpkins one colour but to create a backdrop for the bats to fly against. I had decided I didn't want to completely cover up the natural orange of the pumpkin and so settled on a sunset and contrasting silhouette background which allowed me to incorporate it.

Overall I'm really pleased with how the pumpkins turned out and think they would be perfect for indoor display on windowsills, by fireplaces or as table centrepieces at your Halloween party, however I wouldn't recommend placing them outside in bad weather! Here's a little bit more about how I achieved the final designs...

halloween pumpkin decorating diy eightandsixteen

I started off by mapping out the landscape design onto the surface of the pumpkin using a trusty FriXion pen. I then used chalkboard paint to black out these areas, choosing this type of paint as I thought it would adhere best to the surface. It also gave a nice matte finish once dried, adding to the final effect of the design.

halloween pumpkin decorating diy eightandsixteen

Next I used acrylic paints mixed with Mod Podge (to help them stick to the surface) and sponge brushes to create a sunset effect on the top half of the pumpkin. As I mentioned above I wanted to try and include the bright natural orange tones of the pumpkin's skin so a sunset seemed like the perfect way to do this.

halloween pumpkin decorating diy eightandsixteen

For an extra final touch I used Mod Podge to stick on a few tiny nail art gems to represent stars in the evening sky. Then finally I added on the felt bats that had originally inspired the whole idea. After cutting out the bats I used jewellery wire to attach them onto the pumpkin. To make sure they were secure I used a wooden skewer to first pierce holes into the pumpkin's surface then threaded the wires through these and the outer layer of the pumpkin.

For my second pumpkin the process was exactly the same except this time I opted for a cityscape style silhouette, which with the bats I think feels very Gotham!

halloween pumpkin decorating diy eightandsixteen

We'd love to hear from you if you try out this or any of our other DIY projects - use the hashtag #eightandsixteen to share your photos with us!

Erin

Monday 20 October 2014

Pumpkin Decorating Challenge Week!

diy-challenge-pumpkins

What would an October full of Halloween inspired projects be without pumpkins? This week we'll be introducing our new 'challenge week' format and will each be sharing our own pumpkin decorating ideas. Look out for Erin's finished pumpkins on Wednesday followed by Skye's on Friday!

We'd love to hear how you're planning to decorate yours this year - use the hash tag #eightandsixteen to share your photos with us!

Skye & Erin

Friday 17 October 2014

PinTest: Ping Pong Ball Pumpkin Lights


Today's PinTest has been one of my favourite so far, and is based on a simple Christmas fairy lights hack that you can see here.
I decided to use this method to create some super cute pumpkin Halloween lights; this is a cheap and relatively quick project and is a great way to add some spooky decor to your home!

All you need to recreate this DIY are some fairy lights, enough ping pong balls to cover the lights (I needed 40), a black sharpie marker and a scalpel.


First, mark a small cross on your ping pong balls with a pencil. Then using a scalpel, very carefully cut through the ping pong ball over the cross. Note: Use some blu tack to hold your ping pong ball in place whilst you are cutting.


Next, take your sharpie marker and get drawing on the opposite side of your ping pong balls to the crosses you have just made. I went for classic pumpkin designs but you could draw anything spooky!


Carefully push your ping pong balls onto your fairy lights through the crosses you made earlier.


Repeat until all of the fairy lights are covered - and you're all done!


We'd love to hear from you if you give this DIY a go - use the hash tag #eightandsixteen to share your photos with us!

Skye


Wednesday 15 October 2014

DIY Upcycled Candy Corn Earrings

diy upcycled candy corn earrings using paperclips halloween

Being a big fan of all things Halloween it seems that every time I see triangles I see candy corn... and that's how today's DIY came about! Upcycled paperclip earrings like these are a really popular project on sites like Pinterest but for today's post I've put my own spin on the idea by using the candy corn trio of colours just in time for Halloween!
Here's what you'll need to make your own pair of Candy Corn earrings...

diy upcycled candy corn earrings using paperclips halloween

1. Start by bending out your paperclip into a triangle shape. If there is a gap between the two ends of wire use masking or washi tape to secure your triangle in place

If you're working with coated paperclips you can choose to remove the plastic coating or leave it on - it's up to you!

diy upcycled candy corn earrings using paperclips halloween

2. Tie on a long length of yellow thread and tightly wrap all the way around the triangle, when you reach the end knot the thread in place and add a dab of glue if needed

diy upcycled candy corn earrings using paperclips halloween

3. Tie on another length of yellow thread a little way down from the base of the triangle and wrap across approx. one third of the way down the triangle

diy upcycled candy corn earrings using paperclips halloween

4. Once you have finished wrapping the first section tie your orange thread onto the end of the yellow one and continue wrapping across. Make sure the knot is on what will become the back of the earring and don't worry about it showing - it will be wrapped between the layers of thread!

diy upcycled candy corn earrings using paperclips halloween

5. Once you've wrapped the orange section repeat the process for the white section. When you reach the end secure the thread in place with a knot and some glue if needed

6. Finish up by adding on an earring wire - you can either add it onto the base of the triangle or the point depending on which way you want the earrings to hang!

7. Repeat the process to create a second earring and your new earrings are ready to wear!

diy upcycled candy corn earrings using paperclips halloween

We'd love to hear from you if you try out this or any of our other DIY projects - use the hashtag #eightandsixteen to share your photos with us!

Erin

Monday 13 October 2014

Reader's Projects #2

Last month we showcased projects submitted by some of you, our lovely readers, and today we have a few more to share! Here's what our reader's have been busy crafting lately...

saoirse projectssaoirse projects

We had two lovely projects sent in by Saoirse - a cute origami elephant and a beautiful moon wall hanging inspired by one of Erin's tutorials! - @xleptodactylous

reader project angelcasts

One of our Twitter followers Ami sent us a little collage of what she's been working on lately including this fingerprint necklace! You can find more of her jewellery and castings at her online shop Angelcasts - @angelcastshelp


Thank you to Saoirse & Ami for sharing these awesome makes! If you have a crafty project you want to share with the Eight & Sixteen community we would love to hear from you. Just drop us an email or tweet to be included in a future post!

Erin & Skye

Friday 10 October 2014

DIY Newspaper Ghost Garland


To get into the Halloween spirit, I decided to adapt my DIY Hanging Flower Garland to create a spooky ghost garland - from newspaper!

This is a great recycling project that is really effective and simple to put together; it would be a great DIY to make with little ones, and you could also try other Halloween shapes such as witches hats or if you were feeling adventurous, a skeleton!


Draw your ghost template onto a 2-3 folded newspaper sheets and cut out. Cut out two holes for the eyes and then repeat these two steps until you have enough ghosts.
Tie 6 lengths of invisible thread to a bamboo cane, and then begin sticking the ghosts down each piece of thread using invisible tape. Don't worry too much about spacing - try clustering some ghosts together and then having one separate at the bottom of the thread.

Once all your ghosts are secure, find somewhere to hang your garland - if you're having a party then hanging the garland from your doorframe will instantly set a creepy atmosphere!


We'd love to hear from you if you give this DIY a go - use the hash tag #eightandsixteen to share your photos with us!

Skye


Wednesday 8 October 2014

PinTest: Wire Skull Decorations

pintest wire skulls

When I saw this Pin I knew I had to try it out and what better time of year than Halloween! These would make awesome decorations for a party both alone or grouped together to create a mobile and as it turns out they aren’t too tricky to DIY. Here’s a little more about how I got on with this Pin…

I started out by drawing my designs onto a sheet of paper so I’d know what final look I was aiming for as well as what different pieces I needed to make for each one. The designs I drew were mixtures of various parts I liked from the skulls in the original Pin but I tried to keep them fairly simple as I had no idea how well I was going to get on with the making process, but you can make them as complicated as you like.

I decided that it would be best to create the outline of the skull first and then add on the extra pieces. The skull outlines themselves were quite easy to make especially as they didn’t have to be spot on and I made sure I created a loop at the top of each one for hanging. I then made the eyes/nose section and the mouth section, leaving a length of wire at each end to attach them onto the outline frame.

For the first two skulls I worked with the blue wire which turned out to be more difficult to use than the gold due to how bendy it was! Although it was easy to manipulate the wire into the right shapes at times it proved difficult to keep them in place. The gold wire was slightly thicker and less flexible so the pieces kept their shape better whilst I was attaching them together.

I had a lot of fun making these skulls and I’m pretty pleased with how they turned out even though the wire I used wasn’t ideal. If you want to make your own I’d advise picking up a thicker wire that’s flexible but will hold it’s shape whilst you’re trying to add on the facial feature pieces.

We'd love to hear from you if you try out this Pin - use the hash tag #eightandsixteen to share your photos with us. If there are any particular Pins you'd like to see us test out let us know in the comments!

Erin

Monday 6 October 2014

2014 Christmas Craft Calendar

bunting xmas

Today I wanted to write a quick post to share this handy little calendar created by Chums. The calendar features details on various festive events happening up and down the country over the next couple of months including craft fairs and markets. So, if you're on the lookout for some crafty events to pop along to or would just like to source some lovely handmade or vintage gifts for your friends & family this year, you can find out what events are happening near you by checking out the calendar!

Will you be visiting any Christmas fairs or markets this year?

Erin

Friday 3 October 2014

Edward's Menagerie Make - Alexandre the Cat (aka Puss)


As promised, here is my attempt at one of the cute creatures from Edward's Menagerie by Kerry Lord.
As I said in our review, I knew that I wanted to attempt making Alexandre the cat - though my little guy is aptly named Puss - and despite being in the beginners section of the book, I have found making him a real learning curve.

With this being my first attempt at amigurumi, I decided to raid my wool stash instead of buying some of the beautiful TOFT wool. As tempting as it was, I'm glad I made this decision as there are tons of mistakes in Puss, and it would have been a shame to waste good wool.
When I say that I raided the stash, I meant it! I used every single scrap I could find in a similar colour way, with the result being a rather scrappy looking Puss - I think it suits him!

It took several attempts for me to get the hang of crocheting (and a few extra legs I might add) but I really think that I'm getting to grips with it now. You definitely need to keep a count of your stitches and rows and I have a sneaky suspicion I lost track a little on the body as it seems a bit too long.
Edward's Menagerie is great for advice and learning the techniques, and I will definitely be adding the book to my wishlist as I'd love to have it on my bookshelf. The most useful thing for me was being able to watch Kerry's tutorials on Youtube; I am definitely a visual learner and things made sense so much more quickly after watching these.

It's been so much fun to get to grips with crochet, and even better to learn with such a cute outcome. My next aim is to buy some TOFT wool and start making a few creatures that will hopefully be ready in time to give as Christmas presents - wish me luck :)


We'd love to hear from you if you've made anything from Edward's Menagerie - use the hash tag #eightandsixteen to share your photos with us!

Skye


Wednesday 1 October 2014

DIY Quilted Cobweb Coasters

diy quilted cobweb coasters halloween crafts

Coasters are a great beginner quilting project as you get to learn all the basic techniques but on a small, more manageable scale. I made these cobweb coasters back in the summer and they were actually my first ever completed quilting and binding project, so if you're a beginner this could be the perfect Halloween project for you!

Below I will take you through a step-by-step of how to get your coaster ready for binding but as the binding process itself takes a little bit of explaining and I'm no expert I have linked to a great tutorial which will show you how to finish off the project.

To make your own cobweb coaster you will need: a 5x5" plain coloured fabric square, a 5x5" patterned fabric square, a 5x5" square of wadding/batting, a sewing machine, an erasable pen, pins/clover clips, strips of fabric for binding, an iron, a needle and thread, a ruler

cobweb coasters diy halloween crafts sewing quilting spiderwebcobweb coasters diy halloween crafts sewing quilting spiderweb

1. Take an erasable pen (we recommend Frixion pens) and draw out a cobweb design onto your plain coloured square. Start by plotting out the diagonal lines using a ruler then go back and fill in the curved lines

2. Next layer up your fabric "sandwich" ready to sew. Place the patterned fabric face down on your work surface, followed by your square of batting and finally your plain fabric face up - pin in place if necessary

3. Choose your preferred quilting stitch and sew over the cobweb design, joining all of the layers together

4. Trim off any excess threads and neaten off the edges of your fabric making sure it is still square. Use a zig zag stitch to go around the edges just to keep them flat ready for the binding process

cobweb coasters binding tutorial halloween spiderweb quilting

5. To bind the coaster I would recommend using the 'one piece' or single binding method, finishing off with a ladder stitch. If you are a beginner here is great tutorial to get you started - http://verykerryberry.blogspot.co.uk/2011/01/single-binding-tutorial.html - however if you already have a preferred method of binding then of course you can use that instead!

We'd love to hear from you if you try out this spooky DIY project - use the hashtag #eightandsixteen to share your photos with us!

Erin
Related Posts Plugin for WordPress, Blogger...