tabs

es about us es contact es archive es challenge es we love 9 es recipes es pintests es links

Wednesday 30 July 2014

DIY Harry Potter Inspired Fabric Envelope Phone Pouch

harry potter pouch

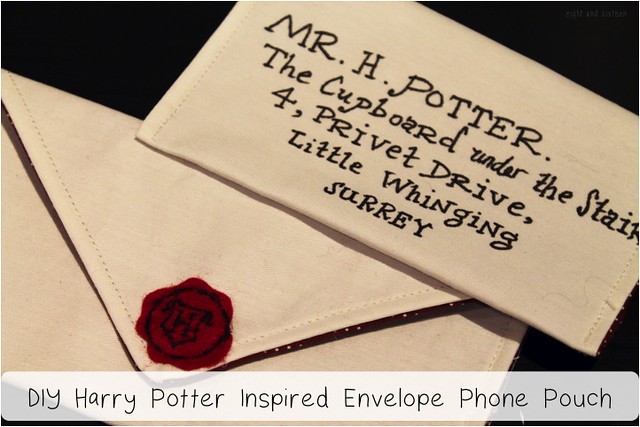
Yesterday we introduced our second 'We Love' topic; Harry Potter! Today's tutorial is the first of several Harry Potter inspired projects we'll be sharing over the next few weeks - a cute but geeky phone pouch! Just read the steps below to find out how you can make your own version :)

Before you get started here's a couple of things to keep in mind...
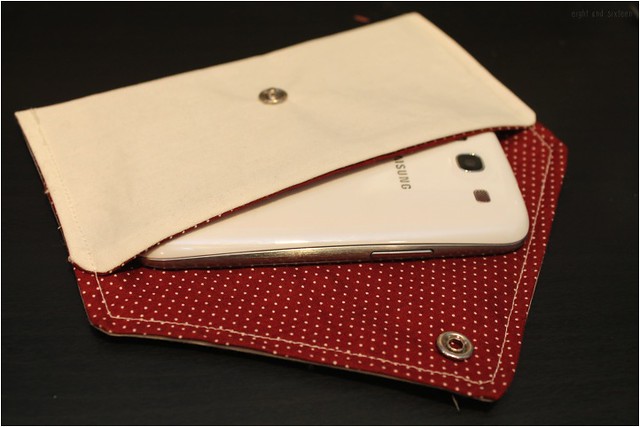
  • The size of the finished pouch using the measurements below is approx. 7 x 3.5" and will fit a Samsung Galaxy S3 or similar sized phone. Make sure you adjust the measurements before you start if you want to make the pouch fit a different phone model or other gadget
  • For this tutorial I'm going to share how to make a simple fold-over style envelope. If you would like a more classic envelope shape you can follow the same method but use a paper envelope as a template, and hand-stitch together at the end!

You will need: a plain light coloured fabric, a patterned fabric for lining, lightweight iron-on interfacing, a fabric paint pen, a sewing machine, a ruler & rotary cutter/scissors, an iron, an erasable fabric pen, a popper fastening (or alternative), a glue gun

harry potter pouch 1

Cutting The Fabrics

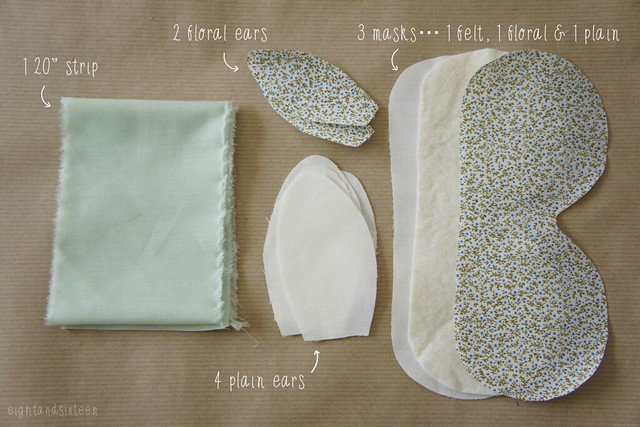
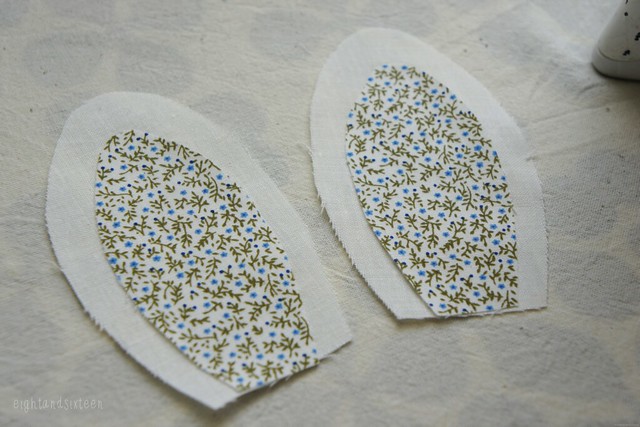
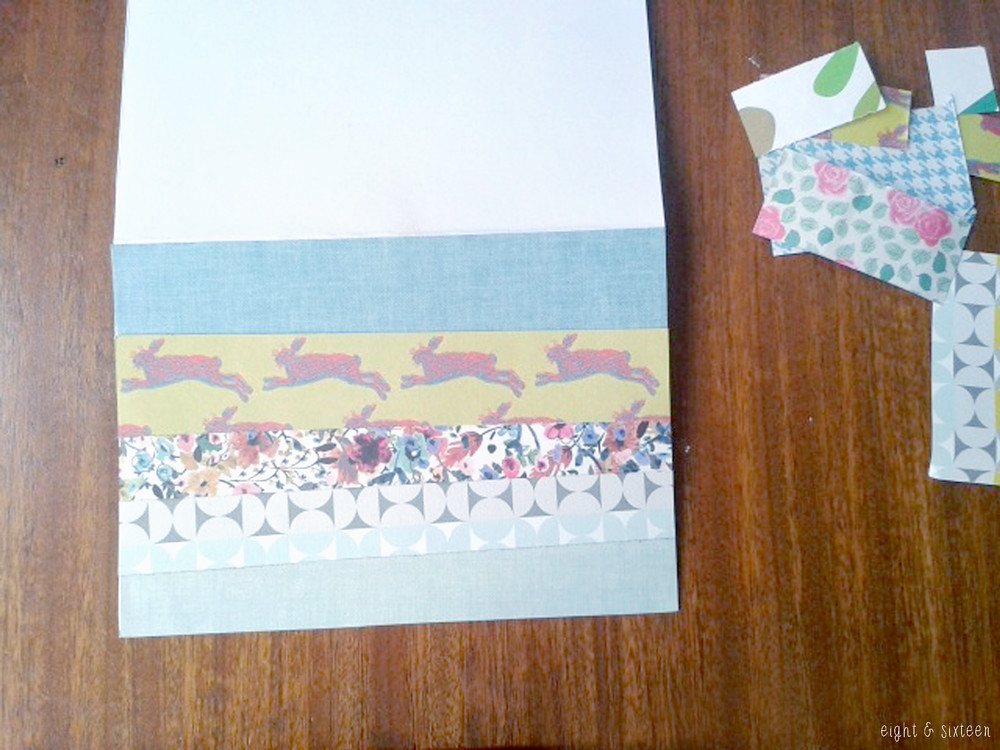
1. Cut three pieces of fabric all measuring 11 x 7 - one from the plain fabric, one from the patterned and one from the interfacing

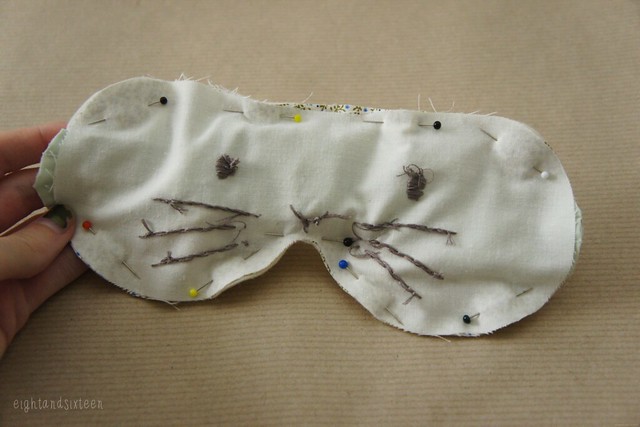
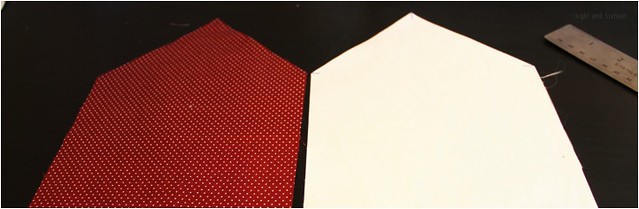
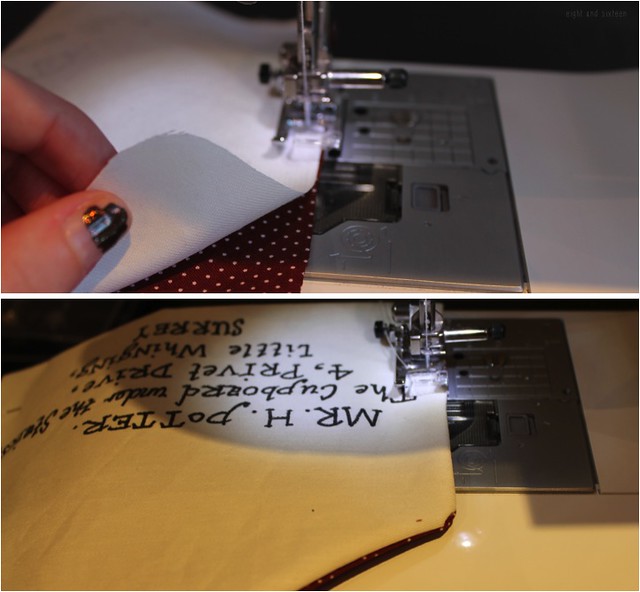
2. Use your ruler to measure halfway across the top of the plain fabric and mark with your erasable pen. Make two more marks, one on each edge, 3" down from the top. Join these up with your erasable pen so that you have a triangle shape and cut away the excess fabric. Repeat for the interfacing and lining fabrics so the pieces look like the photo above

3. Iron your piece of interfacing onto the plain fabric (as per the instructions) and set aside the patterned lining fabric

harry potter pouch 2

Adding The Address

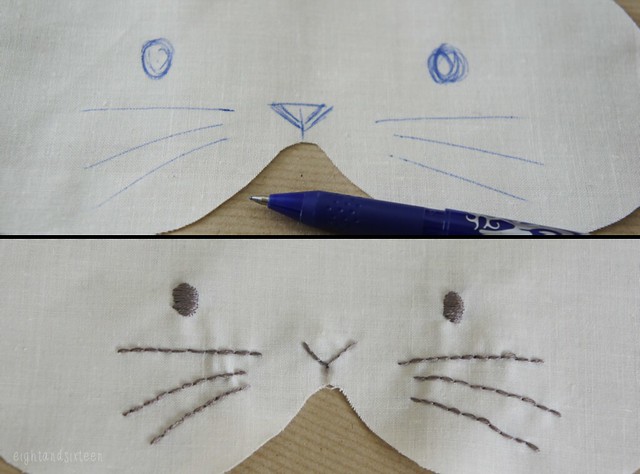
4. Take your erasable pen and draw a line across the front of the plain fabric where you previously drew the markers for creating the triangle. Take your pen and draw another line across the fabric 4" underneath the first line - the space left in between the two is where the writing will go

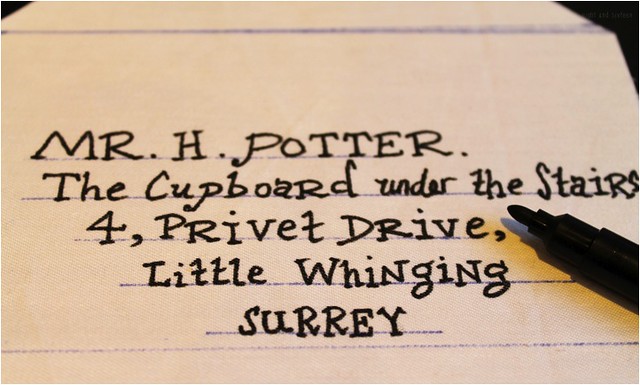
5. Still using your erasable pen mark out lines where each line of the address should go so that you have a guideline to follow. You'll be using a fabric pen to write the address so you don't want to make any mistakes or find that the writing doesn't fit in!
For guidance the top line of writing on my pouch measures around 4" long and the last line 1.5" long

6. Swap your erasable pen for the fabric marker (I used a Fine nib Fabric Paint pen by Dylon) and add on the famous address. I chose to write it out in a similar font to the one from the films but it's up to you what style you want to write in. Set the address in place with your iron, following the instructions provided on the fabric paint pen packaging as brands may vary

harry potter pouch 3

Sewing The Pouch

7. Place your plain and patterned lining fabrics right sides together and pin in place

8. Use your sewing machine to stitch all the way around the edge with a 5mm seam allowance - don't forget to leave a small gap on one edge for turning the fabrics back the right way!

9. Trim off any corners and turn your fabrics back the right way. Press the envelope out with your iron and close up the gap. You can stitch up the gap by hand if you like but I took a short cut and used a small strip of hemming web to fuse it together

10. Fold up the bottom half of the fabric to create the pouch pocket and iron, then pin into place ready for sewing

11. Start at one of the bottom corners and stitch all the way around the pouch, round the edge of the triangle shape, to the opposite bottom corner using a 5mm seam allowance - don't forget to backstitch a little at each end to secure it

harry potter pouch 4

Adding The Fastening 'Seal'

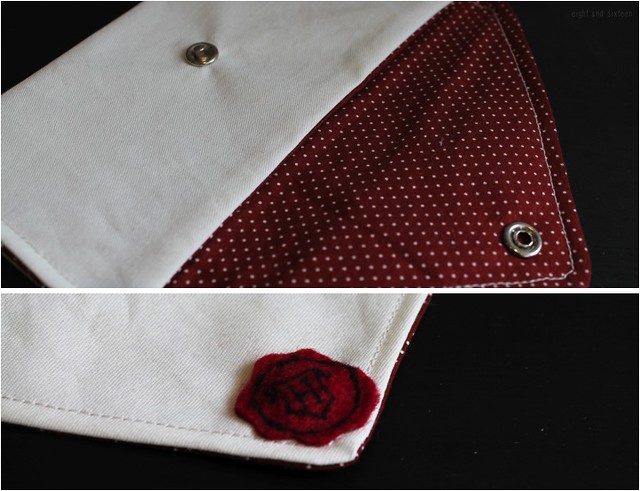
12. Add on your popper fastening as shown in the instruction leaflet - alternatively you could use a small piece of velcro

13. To create the faux Hogwarts seal cut an uneven 'wax blob' shape from a piece of dark red felt and handstitch or draw on the crest design (I used a fine nib permanant marker)

14. Use a glue gun or handstitch the felt onto the popper and your envelope pouch is finished!

harry potter pouch 5

We'd love to hear from you if you try out this DIY project - use the hashtag #eightandsixteen to share your photos with us!

Don't forget to check back next week for another Harry Potter inspired project!

Erin

Tuesday 29 July 2014

Advertise With Eight & Sixteen!

It's that time of the month again; if you run a creative business or blog and would like to sponsor Eight & Sixteen in August then we would love to hear from you!

We've loved having some of our creative friends and businesses in our sidebar this month, and you can find out more about them all HERE.

Although Eight & Sixteen is still a very new venture, we have been overwhelmed with your support so far and are loving every minute of what we're building here. We are currently offering discounted rates if you book a 200px x 100px spot with us for 2 months, and you will also be featured in a spotlight post on our advertisers during the month.

If you'd like any more information on advertising with Eight & Sixteen, feel free to email us at: eightandsixteen[at]gmail[dot]com or just pop us a comment below.

Erin & Skye

Monday 28 July 2014

We Love... Harry Potter

we love harry potter

One of the first things we discovered we had in common was a love of Harry Potter and of course, we're not the only ones. Earlier this month marked three years since the release of final movie adaptaion The Deathly Hallows Part 2 so, what better subject for our next We Love... series?

Over the next four weeks, amongst our usual variety of posts, we'll be sharing some Harry Potter inspired DIYs perfect for our fellow fans to celebrate this amazing series!

Don't forget to check back on Wednesday for the first tutorial! :)

Erin & Skye

Saturday 26 July 2014

Eight & Sixteen - Roundup #2

e and s roundup july 14

It's roundup time again! We can't quite believe we're already posting our second Eight & Sixteen roundup as it means the blog has been live for two months now - time flies! Here's a look back at our second month's posts...


  • DIY Shabby Chic Photo Coasters
  • Recipe: Nutella Milkshake
  • Jewellery 101 - DIY Wire Bead Cage
  • DIY Envelopes
  • Book Review: Sticky Fingers, Sophie Maletsky (2014)
  • Meet Our Friends... Introducing July's Sponsors
  • PinTest: Juice Carton Coin Purse
  • DIY Duct Tape Tassel Keyring (inspired by Sticky Fingers)
  • Kit Review: Floss & Mischief Cross Stitch
  • DIY Challenge: Storage Bowls
  • DIY Scrap Paper Cards
  • DIY Revamp: Bunny Eye/Sleep Mask


  • We'd love to hear your thoughts and feedback on this month's posts so don't forget to leave a comment or tweet us using the hashtag #eightandsixteen  

    You can also vote on which type of posts you would like to see more of here in future by taking the anonymous poll in the sidebar on the right!

    Erin & Skye

    Friday 25 July 2014

    DIY Revamp - Bunny Eye/Sleep Mask

    diy bunny sleep eye mask eight and sixteen

    When we were throwing around ideas for features here at Eight & Sixteen one style of DIY posts we came up with was revamps. We thought it would be fun to try out some of each other's DIY projects, put our own spin on them and share our versions with you here!

    Today I'm sharing my take on Skye's Eye Mask post originally created for her blog Even Artichokes Have Hearts back in 2011 (in the early days of us becoming friends!). Skye's version was reversible featuring a cute embroidery design and a pretty floral print. For my version I've decided to incorporate my love of bunnies and add on ears! Here's how I made it...

    diy bunny sleep eye mask eight and sixteen

    I started out by creating templates for both the main part of the mask and the bunny ears, then worked out what pieces I would need to cut. I then used my templates to cut them all out and also cut a long strip of mint green fabric to use to encase the elastic.

    diy bunny sleep eye mask eight and sixteen

    To add the bunny face onto the mask I grabbed one of my FriXion pens (these are erasable and fantastic!) and sketched on a design which I then hand stitched over using an embroidery thread.

    diy bunny sleep eye mask eight and sixteen

    I wanted to add a little bit of colour to the front of the mask so I decided to add floral pieces as detailing on the ears. I ironed the floral fabric pieces onto the plain ones using a little bit of hemming web to fuse them together then hand stitched over the edges to keep everything in place and prevent fraying.

    Then came the first bit of machine sewing! I stitched together the ears by sewing the front and back ear pieces together then turning inside out. Next I made a long tube with the mint green fabric, turned back the right way and stitched on two rows just a bit wider than my elastic. I used a safety pin to thread the elastic into the tube then lined up one end of the elastic with the end of the tube and stitched it place, and repeated with the other end creating a gathered effect.

    diy bunny sleep eye mask eight and sixteen

    Finally I put all of the layers together in the right order - felt, floral fabric face up, ears face up, elastic band, front fabric face down and stitched almost all of the way around the outside - just leaving a small gap for turning out. I used an overlock style stitch on my machine as well as using a normal straight stitch just to help prevent fraying.

    I crossed my fingers that it had all worked out according to plan then turned it back the right way - luckily it had worked! I ironed it flat and lastly closed up gap using a little hemming web.

    diy bunny sleep eye mask eight and sixteen

    There are definitely a few tweaks I would make if I were to have a second attempt at this project, particularly the shaping around the nose, but overall I'm pleased with how it turned out! :)

    We'd love to hear from you if you try out this or any of our other DIY projects - use the hashtag #eightandsixteen to share your photos with us!

    Erin

    Wednesday 23 July 2014

    DIY Scrap Paper Cards


    These cards have been inspired by Erin's Fabric Scrap Cards that she posted about recently on her own blog.
    After making the DIY Envelopes a few weeks ago, I realised that the pieces left over would be perfect to make scrap paper cards, and they compliment the envelopes perfectly!
    You could make a whole set of these to give to a friend, or personalise them for different people by using old photographs or memorabilia relevant to them.


    1. First, collect together all of your scrap paper. I cut some of my strips so that I had pieces of varying widths - don't worry too much about being neat!


    2. Take a blank piece of card and fold in half. Decide whether your card will be portrait or landscape, and then start laying out the paper strips to create a combination you're happy with. Once that's done, glue the strips into place.


    3. Trim any excess paper from the sides (and keep those strips for a different design on another card!) and that's it, all finished!


    We'd love to hear from you if you give this DIY a go - use the hash tag #eightandsixteen to share your photos with us!

    Skye


    Monday 21 July 2014

    DIY Challenge: Storage Bowls

    bowls challenge title

    Today we have our second DIY challenge - storage bowls! We both liked the idea of creating bowls for storing our craft supplies, and decided to take on different materials to create them: fabric and paper mache.

    Here's what we came up with....

    Erin's Storage Bowl
    diy challenge fabric bowls
    diy challenge fabric bowls

    For my project I chose to make a bowl using fabric. I'd already seen a few of these around on Pinterest and thought it looked like a great idea! To create it I covered a china bowl with clingfilm (to use for shaping), cut strips of fabric, coated them in a mixture of Mod Podge and water and layered them onto the bowl. I wanted the inside to be floral so I layered these strips on first face down, then added a layer of blue strips for the outside of the bowl and left to dry overnight. After removing it from the china bowl and peeling away the clingfilm the last step was to trim the edges and cover them with a strip of bias binding for a neater finish.

    To be honest I'm not that pleased with how my bowl project turned out. Although the method works well I don't think the fabrics that I chose gave the best results. If I were to have a second attempt at this project I would definitely stay away from fabrics with white backgrounds. As the Mod Podge/water mixture means that the fabrics dry to a slightly transparent finish you can see the colour of the second fabric through any white sections. Perhaps two layers of each fabric would also give a nicer finish however it took long enough to dry with just the two layers!

    Skye's Storage Bowls

    Making paper mache bowls definitely felt like a trip down memory lane for me; Art Attack anyone?! Although this method is pretty easy, it does take a long time as there is a lot of waiting around for glue to dry.

    I used 4 different shaped and sized balloons and set to work covering them in strips of newspaper and PVA glue (If you have some old bowls or glasses, these come in handy to prop your balloons in whilst waiting for the layers to dry). In the end I did three newspaper layers, and then added a final kitchen towel layer which gives the textured finish.
    I also added bases to the bowls by cutting a cardboard tube into 4 pieces, and attaching it to the bottom of the bowls with more newspaper and PVA glue.
    Once the paper mache was completely dry, I burst the balloons and trimmed the top edges to neaten. Then I simply painted each one and added a coat of varnish once the paint had dried to seal everything.

    I definitely had fun making these bowls, but I think if I made them again I would be more patient and add a few more layers of paper mache for strength. I have filled each bowl with various supplies, but they are a little flimsy and I think that some extra strength would help them to stand the test of time.

    We'd love to hear from you if you try out this DIY project - use the hashtag #eightandsixteen to share your photos with us!

    Erin & Skye

    email | twitter | facebook | pinterest | bloglovin'

    Friday 18 July 2014

    Kit Review: Floss & Mischief Cross Stitch


    I've had this kit for a few months now after winning it in a competition and it's been the perfect craft to pick up when I have 5 spare minutes or am watching a film.

    Floss & Mischief create awesome contemporary cross stitch kits and PDF patterns and I adore their style - this Blue Dragonfly is a particular favourite!
    I especially love the centre feather of this design, and finishing it has made me desperate to get on and finish the others so I can get it up on the wall :)

    The kit comes with everything you need including beautifully coloured threads, an easy to read chart and a really useful double sided information sheet on cross stitch basics.
    All in all I think these kits are great - I think they'd make awesome gifts, and the designs are amazing and definitely not what people expect to see when you're cross stitching away on the bus (I do this a lot!).


    Have you tried any of the kits from Floss & Mischief? We'd love to hear what you think so don't forget to leave a comment or tweet us using the hashtag #eightandsixteen 

    Skye


    Wednesday 16 July 2014

    DIY Duct Tape Tassel Keyring (inspired by Sticky Fingers)

    duct tape tassels 1

    Today's tutorial is based on the first project I tried out from duct tape craft book Sticky Fingers which I reviewed here last week. I decided to start off with one of the more simple ideas from the 'quick crafts' section of the book (this project was rated a 2/5 for difficulty) and stumbled across these pretty tassels that I thought would make great keyrings!

    You will need: duct tape (this project works best if you have two different colours), scissors, a keyring

    duct tape tassel 3

    1. The first step is to create a strip of tape called a sticky strip. Cut a piece of duct tape approx. 9" and lay it down on a flat surface, sticky side up - for a larger/fuller tassel use longer strips of tape!

    2. Cut a second 9" strip of tape this time in a different colour and lay it on top of the first strip (sticky sides together) leaving a gap at the top approx. 1"

    3. Fold over the top section so that you're left with a strip that looks like the one above

    duct tape tassel 4

    4. Flip over the strip and use your scissors to cut lines about an eighth of an inch apart along the whole strip. Cut up to the line where the remaining sticky part is but don't cut into it - you'll need it in the next step!

    duct tape tassel 5

    duct tape tassel 6

    5. Take one end of the strip and begin to roll it up using the sticky section to hold it all together. Press together carefully as you go along to make sure the top part is wrapped tightly. Once you have rolled up the whole strip you should have a tassel!

    duct tape tassel 7

    6. If you want to turn it into a keyring (or a pendant) you'll need to add on a hanging loop. Start by cutting a small length of duct tape (approx. 2.5" should be long enough), fold in half (sticky sides together) and trim it down so that it is approx. 1/4" wide

    duct tape tassel 8

    7. Take the strip and fold it in half around the top of your tassel to create the hanging loop

    8. Secure it onto the tassel with another thin (non-folded) piece of duct tape simply wrapped around the top

    9. Add on a keyring and your duct tape project is complete!

    duct tape tassel 10

    If you have enjoyed this project want to find out how to make lots more duct tape projects I'd definitely recommend picking up a copy of Sticky Fingers!

    We'd love to hear from you if you try out this DIY project - use the hashtag #eightandsixteen to share your photos with us!

    Erin

    Monday 14 July 2014

    PinTest: Juice Carton Coin Purse


    Welcome to our first PinTest post! When browsing for DIY's on Pinterest, you'll almost always see a Juice Carton Coin Purse somewhere along the way - they seem super popular!

    There are lots of tutorials and variations on ways to make them (Click here to see the original Pin!) but here's the method I went with:


    1. You will need a juice carton, a scalpel, a ruler, scissors and a pen.
    2. First, remove the square bottom of the juice carton.
    3. From the bottom edge, measure and mark at 3" and 5" - connect these marks around the side and back edges of the carton, but not the front.
    4. Cut away the excess carton either side of those lines, leaving the front in tact as shown.


    5. Flatten the back and side pieces down to create to folds at the centre side pieces.
    6. Create two more alternate folds within the side pieces to create concertina pleats. These are the purse gussets.
    7. Fold up the bottom of the front carton piece and fold into place.
    8. Fold the excess edge under and tuck it into the concertina pleats. This is the front body of your purse.


    9. On the front of the carton, remove the top flap piece (this bit usually has the date on it). Take off the lid. This top piece will become the purse flap.
    10. Using a scalpel, remove the twist cap from the carton.
    11. Using the fold already in place underneath the hole, fold the top piece of card down onto the main carton piece, draw around the hole and cut out.
    12. Fold the top into place and then fold down onto the front body of the purse. Draw around the hole on the front body.


    13. Unfold the front body from the side gussets and cut the hole out.
    14. Take the twist cap that you removed earlier, and push it through the hole on the front body.
    15. Fold the front body back into place as shown.
    16. Bring the purse flap down and over the twist cap, screw on the lid, and that's the purse all finished!

    Although the juice carton packaging is enough of a statement for these purses, I decided to cover mine in some cute craft paper to take it a step further.
    If you want to do this, I would suggest covering the carton with your chosen paper (or paint!) before you start making the purse (it's a little fiddly otherwise!).

    I think these coin purses have been a great first PinTest. They don't just have to be for loose change either - the screw on lid makes them pretty secure so you could try using one as a medicine purse or a mini sewing case!


    We'd love to hear from you if you give this DIY a go - use the hash tag #eightandsixteen to share your photos with us!

    Skye


    Saturday 12 July 2014

    Meet Our Friends... Introducing July's Sponsors

    sponsors

    This month we've taken on our first group of sponsors who's button links you may have noticed over in our sidebar. Rather than just hosting their adverts today we also wanted to properly introduce them to all of you!

    Below you will find a bit more information about each of the sponsors as well as both their social media and business links. Of course we couldn't introduce this lovely bunch to you without also including our top picks from their websites! Keep reading to find out more...

    -------------------------------------------------------------------------------------------------------------------------------------------------------  

    mrs m

    Made By Mrs M

    We love Kate's gorgeous digitally printed fabrics, our top picks are: Streets In The Sky Fabric (£32) and these Fabric Covered Buttons (£3.50)
    Here's a little more info about Kate and her Etsy store Made By Mrs M...

    "Kate studied Fashion & Textiles in the mid 1990's, only returning to the world of art and design after many years working in the City of London. Her work is inspired by life in the city, and in particular the architecture and textile design of the 1950's.

    Kate's primary focus is her fabric designs, however she also works with ceramics, cross stitch and other media as well as exhibiting her textile art across the UK. Kate runs an increasingly popular art, craft and design blog, also entitled Made By Mrs M"

    Social Media Links - Twitter | Facebook | Instagram | Pinterest
    Business Links - Etsy | Folksy 

    ------------------------------------------------------------------------------------------------------------------------------------------------------- 


    landp

    From L&P To English Tea (And Back Again)

    We love Anjali's real mix of posts, our top picks are: her Auckland Adventures series and her amazing selection of Nail Art Posts
    Here's a snippet of what you can expect to find over on Anjali's blog...

    "I'm Anjali and I blog at From L&P to English Tea (And Back Again). I started blogging when I moved from New Zealand to England, but have kept up with and fallen in love with it ever since. While I'm back home in NZ now, I still blog, and I'm still loving it. You can usually find me posting about books, movies, travel (near and far!), DIY, photography and my rather large Harry Potter obsession."

    Social Media links - Twitter | Pinterest | Facebook | Instagram
    Business Link - Etsy

    ------------------------------------------------------------------------------------------------------------------------------------------------------- 


    shark

    Shark Alley 

    We love Sarah's unique jewellery pieces, our top picks are: Sunbird Pendant (£26) and the Dappled Hare & Star Necklace (£55)
    Here's a little bit more information about Sarah's lovely shop...


    "Shark Alley is the creation of Sarah Kelly, a Brighton-based artist who has been working for over twenty years in a variety of artistic fields, including illustration, textile design and mosaic. Working in mixed media has been a passion for years, as well as the concept of making something out of existing bits and pieces and generally upcycling and reusing things where possible.

    Sarah set up Shark Alley in 2010 to return to hands-on making after several tedious years of working digitally. As a committed jewellery-lover, this seemed a good place to start. She loves to keep things fresh and interesting by using different media and creating a range of products, but the inspirations of animals, colour and pattern remain constant.

    Sarah is thrilled to have been selected to take part in Kirstie Allsopp's Handmade Fair at Hampton Court Palace this September and will be showcasing a brand new range of necklaces as well as launching an exciting new look for Shark Alley."

    Social Media Links - Blog | Facebook | Twitter
    Business Link - Shop

    ------------------------------------------------------------------------------------------------------------------------------------------------------- 


    yoga

    Yoga In Sardinia

    Even though crafting is pretty much our method of relaxation (most of the time anyway!), we think Alex has created an amazing solution to keeping relaxed in everyday life. Even if you're super busy, it should still be priority to look after yourself, and her course looks like a great starting point to us.
    Here's more information on Alex and the yoga course...

    "Alex has been practising yoga & meditation for over 15 years and started teaching 5 years ago.
    Alex is a founding member & President of Yoga in Sardinia, a non-profit Cultural Association, based in Sardinia, aimed at promoting the benefits of Yoga, Meditation and Holistic health. She has also recently launched Stress Management for a Modern World, an online mindfulness based stress management course.

    The course is an eight week programme (don’t panic, it only requires around half an hour each day!), developed to introduce you to some simple practices that can help you to become more aware of, and reduce, your stress levels and some key practices to help you to induce a relaxed state in your physical body. The course will also include some introductory practices on how to understand, accept and alter learned thought and behaviour patterns, enabling you to create a more positive state of mind."

    Social Media Links - Blog | Twitter | Facebook | Pinterest
    Business Link - Website

    ------------------------------------------------------------------------------------------------------------------------------------------------------- 


    sands

    Sawyer & Scout

    "Erin has always created such beautiful products for her shop - whether she's making jewellery or textile accessories - and I particularly love her Watermelon Bunting Necklace" - Skye
    Here's a little more about Erin's shop...

    "Sawyer & Scout is the online-based store that Eight & Sixteen co-creator Erin is working on when she's not creating tutorials.

    The website, founded in 2011, started out as a jewellery shop selling a small range of fashionable pieces. Since then there have been a lot of changes and the current jewellery range includes unusual designs such as necklaces made using upcycled board games, a wearable miniature terrarium & even a string of watermelon slice bunting!

    Having recently found a love for sewing Erin now also makes textile gifts such as pouches, pencil cases and hair accessories which are all available on the new look Sawyer & Scout website!"

    Social Media Links - Twitter

    Business Links - Big Cartel | Etsy 

    -------------------------------------------------------------------------------------------------------------------------------------------------------   

    Thank you to all of or July sponsors - we hope you've enjoyed meeting them!

    If you run a creative business or blog and would like to sponsor Eight & Sixteen in August then we would love to hear from you! Just drop an email to eightandsixteen@gmail.com and we will get back to you soon!

    Erin & Skye

    Friday 11 July 2014

    Book Review: Sticky Fingers, Sophie Maletsky (2014)

    *Review copy c/o Netgalley, image via goodreads.com

    sticky fingers

    Sticky Fingers is a quirky and colourful book filled with a huge range of projects surprisingly all made using duct tape!

    Although in the past I had seen wallets made from duct tape and no-sew bag projects lined with it I wasn’t aware of just how many different (and amazing) things you can make with it! The ideas included in this book range from jewellery to wallets, bags, storage and even gift wrap. It seems like the possibilities for this underrated craft supply are endless and I think its great to have so many available together in one book.

    Templates are included for some of the projects (where needed) and another great little addition is the end section which showcases a few ideas for using up your end of roll scraps and even the cardboard centres the rolls of tape come on!

    Sticky Fingers includes so many projects that I loved and wanted to try out so when I first read the book I ran out and bought some rolls of tape to have a go myself. I will be sharing the first project I tried out, a clever but simple accessory idea, with you for next week’s Wednesday tutorial post!

    Overall I think Sticky Fingers is a unique, fun and inspiring book that would be a great addition to any crafter’s collection.

    Sticky Fingers is available to pre-order now at Amazon.co.uk 
    Keep an eye out for a DIY inspired by the book here near Wednesday!

    Have you read this book? We'd love to hear your thoughts so don't forget to leave a comment or tweet us using the hashtag #eightandsixteen 

    Erin
    Related Posts Plugin for WordPress, Blogger...