tabs

es about us es contact es archive es challenge es we love 9 es recipes es pintests es links

Monday 29 September 2014

We Love... Halloween

we love halloween

We couldn't let our first October here at Eight & Sixteen pass by without a Halloween-themed feature! Back in 2012 before we teamed up to work together on this blog we had previously collaborated across our own blogs on a Halloween DIY challenge series. Here's a quick recap of the ideas we shared back then...

1/ Skye's Halloween Crackers
2/ Erin's Trick Or Treat Boxes
3/ Skye's Halloween Wreath
4/ Erin's Spooky Ghosts
5/ Skye's Halloween Cupcakes
6/ Erin's Halloween Cupcakes
7/ Skye's Halloween Nail Art
8/ Erin's Halloween Nail Art

Over the next few weeks we'll be sharing a handful of new Halloween-themed content including DIY, PinTest and recipe posts. If you want to make sure you don't miss out on any of the fun you can subscribe to Eight & Sixteen via Bloglovin' or follow us on Twitter.

Erin & Skye

Friday 26 September 2014

Book Review: Edward's Menagerie, Kerry Lord (2014)

*Review PDF copy & images c/o MLPR
edwards menagerie

Edward’s Menagerie is a beautiful new crochet book from Kerry Lord, the founder of UK alpaca yarn company TOFT. Created for her son Edward the book contains a collection of cute crochet animal patterns perfect for the children in your life… as well as the adults!

Each different animal pattern comes with cute name, character description and of course a step-by-step tutorial. The instructions found in Edward’s Menagerie use UK terminology however it is worth noting that conversions are also included in the book. The patterns are split into three sections depending on their difficulty and range from beginner through to advanced so whatever your skill level there’s a project to try!

Before jumping into the patterns themselves there is also a section on creating the standard forms which make up the base for all of the designs. At the end of the book you’ll find more detailed advice on stuffing the toys, sewing the parts together, adding facial features alongside other tips and tricks.

The amazing range of designs have all been created using TOFT yarns with natural colours that compliment them perfectly. As both of us have used TOFT’s yarns in the past we can vouch for the fact that they are super soft and lovely to work with!
skye toft

This book has completely fuelled my desire to learn crochet properly. Whilst I have crocheted before and made a few different things, I've never really been as comfortable with crochet as knitting - until now!
I absolutely love the concept of this book, and think that every animal is well thought out and as a collection they are just adorable. I especially like Caitlin the Giraffe and I'm definitely going to attempt to make her when I feel confident enough.
I was also happy to see a variety of cats included, and luckily for me Alexandre the Cat is featured in the beginners section. I've been working away on my very on cat, so stay tuned for a post on him next week :) - Skye

erin toft
It was definitely tricky to pick out just two favourite projects from the book as there are so many adorable designs! As a rabbit owner Emma the Bunny of course had to make my list - and really, who could resist those big ears?! Another favourite design is definitely Alice the Zebra with her contrasting stripes and loopy tail. Although I currently have zero crochet skills the awesome collection of designs in Edward's Menagerie has definitely made me want to give this craft a go! - Erin

Find out more on the TOFT website!

Have you read this book? We'd love to hear your thoughts so don't forget to use the hashtag #eightandsixteen to share them with us!

Erin & Skye

Wednesday 24 September 2014

PinTest: Simple Screen Print

pintest screen print diy

Today's PinTest is based on a popular project that shows how to make your own screen prints at home with just a few supplies including a pair of tights!

To create the 'screen' I cut a square from a pair of nylon tights and stretched it out over the embroidery hoop. I then used a Sharpie to draw on my design and kept it simple for this test with a heart shape. To mask off the areas I didn’t want to print I applied a layer of Mod Podge (Glossy) and left to dry, then applied a second layer just to make sure there were no gaps and again left it to dry. To create the print I used acrylic paint and a scrap of cardboard to drag it across the screen making sure to cover the whole design as best I could.

As you can see from the close-up photograph below my print didn't come out as sharp as I was hoping. I'm not sure if this was due to the loose weave of the tights, the type fabric I printed onto, the method I used to distribute the paint or something else entirely. I have however seen other tutorials using sheer materials such as those used for net curtains in place of the nylon tights so perhaps that may give a better finish!

pintest screen print diy

Have you tried out this technique? If so we’d love to hear about your results - use the hash tag #eightandsixteen to share your photos with us!

If there are any particular Pins you'd like to see us test out let us know in the comments!

Erin 

Monday 22 September 2014

Reader's Projects #1

Welcome to the first in a new feature here at Eight & Sixteen; Reader's Projects! In these posts we'll be sharing your crafts and DIYs with the rest of the Eight & Sixteen community. For a chance to have your creations featured in a future post just send us an email or tweet! Here's what our reader's have been busy crafting lately...

Harry Potter DIY Wands 1Harry Potter DIY Wands 8

Anjali followed our recent Harry Potter inspired wand tutorial to create these and we think they look brilliant sitting on her bookshelf! She talked about the project over on her blog From L&P To English Tea so head on over if you want to find out more! - @anjali_kay

hayley elephantshayley elephants

Hayley sent us photos of these adorable elephants she created using this free pattern from All About Ami. Each one took around 4 hours to make using 50g of DK wool and almost 4000 stitches! You can find out more about them over on her blog Water Painted Dreams! - @whathayleydid

vicki shawl

We also received this photo of a cosy knitted shawl from one of our lovely Twitter followers Vicki, the lady behind Kitschimania. You can find this design and more over in her Etsy store! - @kitschimania


After posting the DIY Deathly Hallows Tshirt Inspired By Harry Potter, we received a tweet from Lisa of White Tree Fabrics who excitedly told us that she couldn't wait to give the DIY a try. A few days later, we received this photo of The Avengers tshirt she made for her husband - we love it! - @whitetreefabric


Thank you to Anjali, Hayley, Vicki & Lisa for sharing these awesome makes! If you have a crafty project you want to share with the Eight & Sixteen community we would love to hear from you. Just drop us an email or tweet to be included in a future post!

Erin & Skye

Friday 19 September 2014

Book Review: Stitch It Simple, Beth Sheard (2014)

*Review copy c/o Netgalley, image via Goodreads

stitch it simple


Stitch It Simple is a cute and colourful sewing book featuring 25 beginner projects which can also be customised or built upon for those with more sewing experience.

Most of the ideas included are projects for the home such as cushions, a lampshade, mobiles, a doorstop and bunting. However there are also a few accessory and gift ideas such as slippers, tote bags and even an apron with a cute cupcake design! My personal favourite ideas included Fabric Letters, the Balloon Cushion and the Stylized Tree Cushion (obviously someone else agrees as they are the three projects featured on the cover!).

Alongside the tutorials themselves is a section of information on some of the basics such as how to do simple stitches, appliqué, binding edges etc which is perfect for beginners or to use for reference. There's even a few tips dotted here and there along the way too!

The projects found within this title were all created using fabric collections designed by Kaffe Fassett who also penned the forward to the book. The use of one designer’s collection means that the projects all compliment each other well in terms of colour and style and gives an overall coherent theme to the book.

Stitch It Simple is full of cute ideas and would make a nice gift for a beginner wanting to try out some easy sewing projects.

3stars


Stitch It Simple is released on October 14th & you can pre-order it from Amazon.co.uk now!

 Have you read this book? We'd love to hear your thoughts so don't forget to use the hashtag #eightandsixteen to share them with us!

Erin

Wednesday 17 September 2014

DIY Hanging Flower Garland


I first saw hanging flower garlands on a trip to London with Erin, where Liberty had adorned their ceilings with clusters of garlands - they were gorgeous!
I've created a much smaller scale garland that instead of hanging from the ceiling can simply be hung up on the wall. I think these could also be great decorations for parties or weddings - I went for an autumnal theme with my colour choices but you could go mad with rainbow colours or try a whole garland in one solid colour.


First you need to create your template. Take an A4 sheet of paper and fold it in half and then half again. You can vary the shape of the petals, but I found it easiest to stick to two leaf shapes across each fold in the paper.
Trace your template onto your chosen paper, and cut out. Create a small cross in the middle of your flower by folding it in half one way, and then again the other way.
Using a pair of scissors, curl your petals upwards as you would curl ribbon. You can touch these curls up once the flower is made up, but it is much easier to do the initial curling at this point.
Cut into each petal as shown, but be careful not to cut all the way to the centre of the flower.


Place some glue on the top of one half of a petal, and then bring the petal next to it over and stick it on top.
Repeat this process with the next petal until all 4 are glued together.
You then need to repeat this to join the petals into a flower; work in the same way but try to create a smooth cone shape.

Repeat as many times as needed to create enough flowers for your garland. Then using invisible thread, string your flowers together securing a knot underneath each one so that they hold their place. I used a piece of bamboo as a frame, but you could omit this and just pin your garlands to the wall.


We'd love to hear from you if you give this DIY a go - use the hash tag #eightandsixteen to share your photos with us!

Skye


Monday 15 September 2014

DIY's With Speedy Stamps


Today we have a few DIY ideas to share with you that use our personalised Speedy Stamps stamp (you can see our full review here).

Skye's DIY

For my Speedy Stamps DIY, I decided to make some e&s business cards - a perfect way to show off our logo and the stamp.
I wanted the design of the cards to be simple and let the logo become the main focal point, so simply added different washi tapes in a variety of ways across the cards.
I think that the overall effect is very reflective of the e&s blog - minimalistic but a little playful :)

Erin's DIY
diy business card holder

To compliment Skye's project I decided to use my stamp to make a personalised business card case perfect for protecting your new cards when you're carrying them around in your bag! Not only is this a handy little case to make but it's also a quick and easy project, here's how I did it...

To create the case I cut three 4.5 x 6.5" rectangles, one from felt, one from paper and one from sticky back plastic. I stamped our Eight & Sixteen logo onto the paper before placing it face down onto the sheet of sticky back plastic to create a protective layer for the outside of the case.

I then used a craft glue to stick the piece of felt onto the reverse side of the paper, folded into a case shape and used my sewing machine to stitch together the sides turning it into a pouch style case!


These are just two DIY project ideas that are great for custom stamps - what would you make with yours?

We'd love to hear from you if you give these DIY's a go - use the hash tag #eightandsixteen to share your photos with us! 
 
Erin & Skye

Friday 12 September 2014

5 Ways To Upcycle Tin Cans

5 ways to upcycle tin cans

Today we have another bunch of upcycle projects for you try out, this time they've all been made using tin cans!

tin can pincushion upcycle

Pin Cushion
Take a square of fabric, place some wadding in the centre and wrap to create a shape that fits into the top of your can. Decorate the can with pretty paper or spray paint then glue the fabric cushion into the top! - E


Planter
You can use small half sized tin cans or full sized ones to use as planters depending on the size of your plants. You can of course cover the can in washi tape or craft paper, but I love the contrast of the metal against the greenery. - S


Tealight Holder
Grouped together, tin cans as tealight holders can be super effective. To make, fill an empty tin can with water and leave to freeze. Then using a hammer and a nail, punch your chosen design onto the can. - S

chalkboard tins upcycle storage

Chalkboard Storage Pots
To create these cute pots cover the cans with two layers of chalkboard paint then use thick cardboard to create lids. Glue on large beads or wooden embellishments to use as handles and decorate or label the cans with chalk. - E

tin can garden mobile upcycle diy

Garden Mobile
Carefully drill holes into sides of your can close to what would have been the top of it. Simply decorate using paint, sequins etc then add on lengths of ribbon, strings of beads, found objects such as twigs or anything else you'd like to turn it into a mobile. To hang drill a hole in the base of the tin and add on some twine or wire. - E

We'd love to hear from you if you give these DIY's a go - use the hash tag #eightandsixteen to share your photos with us! 
Erin & Skye

Wednesday 10 September 2014

DIY Simple Upcycled Skirt

diy upcycled skirt tutorial eightandsixteen diy upcycled skirt tutorial eightandsixteen

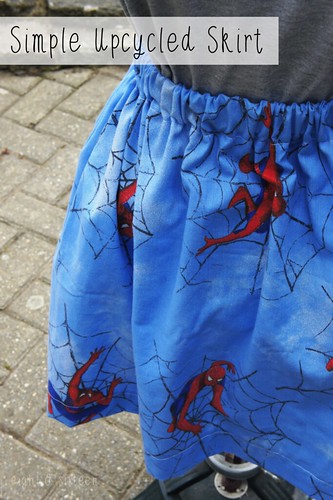
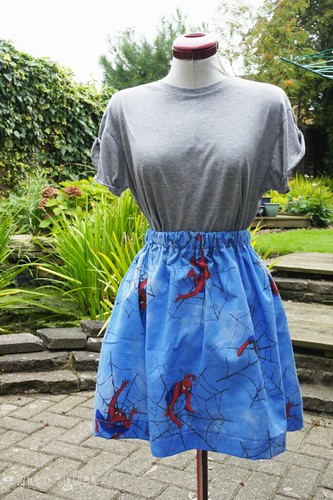
Today I have another easy upcycle project to share with you, this time venturing into the world of dressmaking. This style of skirt is simple to make as well as being thrifty so it's perfect for a beginner project!

You will need: a piece of fabric (for my skirt I used a Spider-Man duvet cover but any piece of fabric will work!), a sewing machine, an iron, pins, 1" wide elastic, a tape measure & a safety pin

1. First up you'll need to cut your fabric to size, start by measuring around your waist. Next decide on what length you want your skirt to be, remember you'll need to add on extra to allow for hemming. If you're not sure what length you want measure from your waist to knee and use this measurement as a starting point.
To calculate the size of your fabric double your waist measurement - if you want a fuller skirt triple it!

For example, if your waist measurement is 27" and your waist to knee measurement is 22" your piece of fabric should measure 54 x 22"

Cut your piece of elastic to your waist measurement plus 1" - so in our example the elastic would be 28" long

diy simple upcycled skirt sewing spider-man

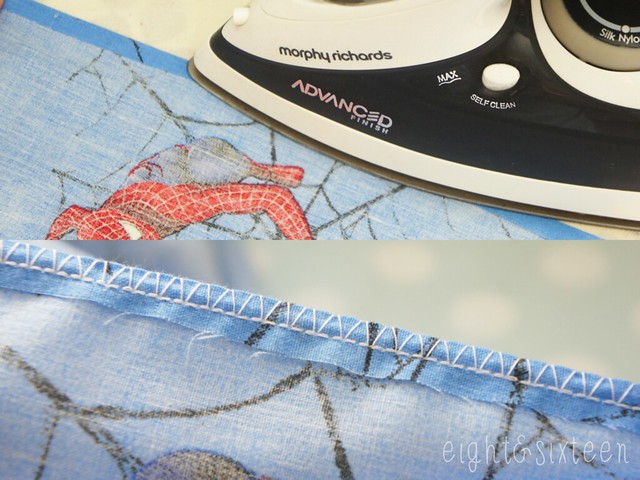
2. Next up we need to turn the strip of fabric into a tube by joining together the two ends. To achieve a neat finish without an overlocker, fold over and iron the edges of your fabric then use a zig zag or similar stitch to secure in place.

diy simple upcycled skirt sewing spider-man

3. Next, place your edges of fabric right sides facing and stitch together about 1/2" from the edge. Press out your seam so it's nice and flat.

diy simple upcycled skirt sewing spider-man

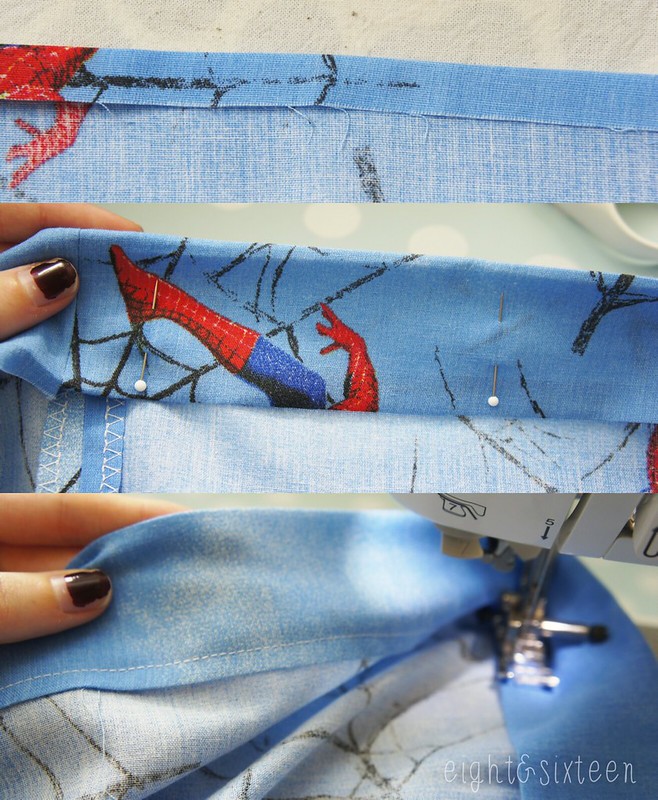
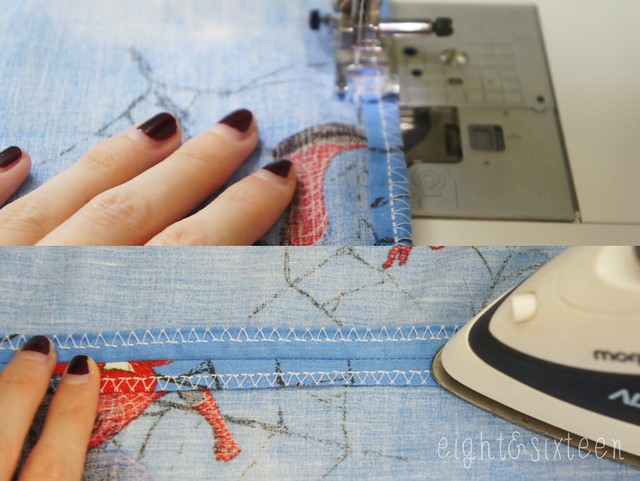
4. Now we're going to work on creating the waist of the skirt. As before fold over about 1/4" and iron the top edge of your fabric, then fold over again this time just over an inch to allow space for your elastic to be threaded through and again iron in place.

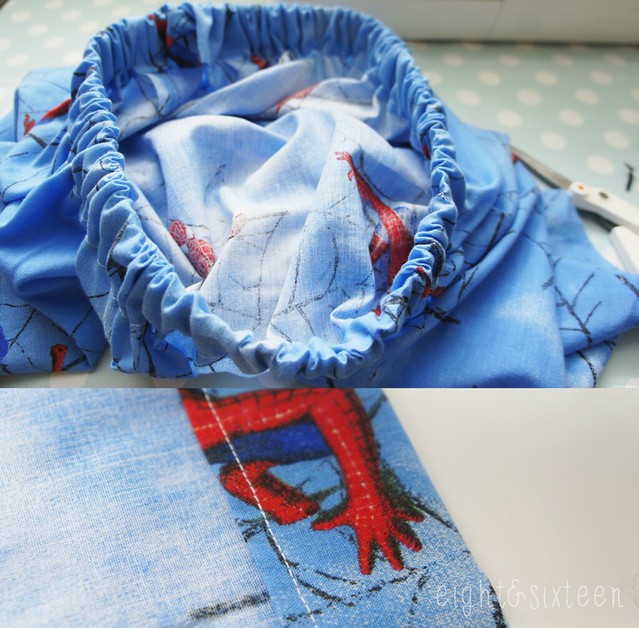
5. Next you'll need to stitch this in place and sew all the way around the fabric approx. 1/4 away from the edge. Before you start to sew make sure you have left a gap of around 2" so that you have space to thread the elastic.

diy simple upcycled skirt sewing spider-man

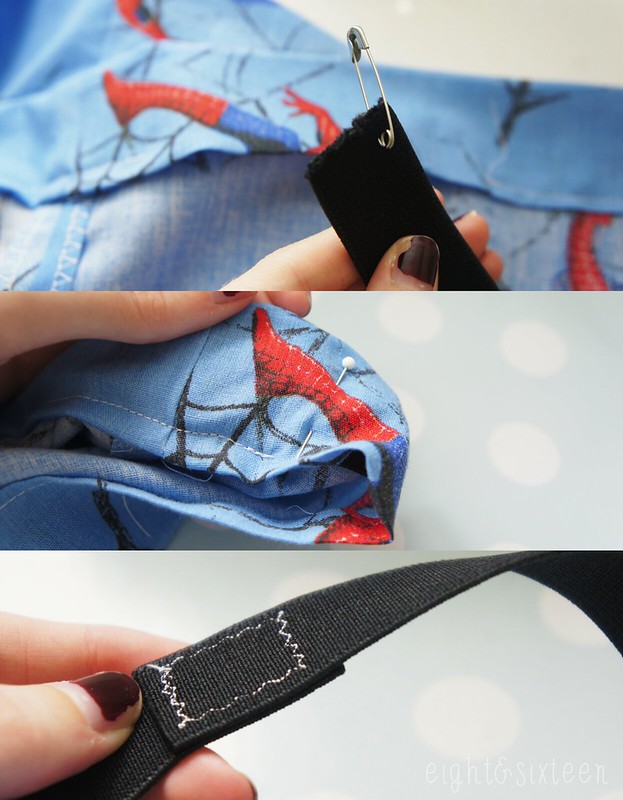
6. Attach a safety pin to the end of your length of elastic and thread through the channel you just created to make the waist of the skirt. When you reach the other end pull your elastic through enough so that you can fit it under your sewing machine

7. Overlap the two ends of elastic and stitch together - make sure you backstitch to keep it secure!

diy simple upcycled skirt sewing spider-man

8. Thread the elastic back through the skirt and place under your sewing machine foot. Stretch out the section where you left a gap earlier so that it is flat allowing you to sew it up.

9. The final step is to hem the skirt. Just as you did to create the waist fold over about 1/4" and iron in place, then fold over again to the length you want to skirt to be and stitch in place.

We'd love to hear from you if you try out this DIY project - use the hashtag #eightandsixteen to share your photos with us!

Erin

Tuesday 9 September 2014

Speedy Stamps Custom Stamp Review

speedy stamps review eightandsixteen

Today we wanted to share these awesome Eight & Sixteen stamps kindly sent to us by Speedy Stamps. The idea behind the business is that you can send in your own design and have it made into a bespoke stamp - perfect for bloggers, small businesses, DIYers and stationery lovers!

The ordering process is simple, all you need to do to create your own stamp is upload a greyscale image of your chosen design, choose a size and the rest is done for you! If design isn’t your thing you can still create a great personalised stamp using the website’s basic tutorials which will help get you started.

Our stamps feature the Eight & Sixteen logo and measure approx. 35cm which is a handy size for lots of projects. A particularly impressive factor was how detailed the stamp design can be as our Eight & Sixteen logo design uses a hand drawn font and dashed line, both of which are thin, we were concerned about how well they would show up on the stamp. As you can see the detail shows up well and we're pleased to say that we are very happy with our new stamps!

If you want to see just a couple of the ways we’ll be using the stamps make sure you check back next Tuesday for a DIY post!

Erin & Skye


Monday 8 September 2014

PinTest: Shaped Pom Poms


For today's PinTest we're trying out some awesome creative pom pom ideas from Mr Printables! From fruity pom poms to letter filled pom poms, there are tons of designs to choose from. Here's how we got on...

Erin's Pom Poms
pom pom erin

As you can probably tell from the picture above I struggled with this project and quickly discovered that these shaped pom poms are pretty tricky to master! As someone who loves Halloween crafts I was drawn straight to the skull design but after looking through the instructions I realised it would be a difficult one to start with and instead opted for the ghost.
I had pretty much given up hope of it turning out well but after revisiting the original tutorial a few days later I realised that I needed to trim it down much more than I already had, and once I did this it looked much more ghost-like.

As much as I love the idea and admire the beautiful original ones shown over at Mr Printables it’s safe to say I don’t have a talent for making them! I do however think that if you can master this clever craft they would make adorable Halloween decorations!

Skye's Pom Poms

When Erin suggested these shaped pom poms for our next PinTest, I was pretty excited - the originals are so cute! However, I really struggled with the DIY and got pretty frustrated trying to replicate them.
I decided to try the strawberry pom pom as I thought it looked relatively simple in comparison to the other designs. I found that once I had wrapped my wool around the template, cutting the wool free without losing any strands was quite fiddly, but I don't know if my technique was just wrong.
I then spent a long time snipping away at my pom pom trying to shape it into a strawberry which took ages. I'm still not very happy with the finished result, and I'm baffled by how great all the other amazing designs look since my attempt.
As cute as the originals are, and as much as I hate to say it, unfortunately I don't think this DIY is for me!


We'd love to hear from you if you give this PinTest a go - use the hash tag #eightandsixteen to share your photos with us! If there are any particular Pins you'd like to see us test out let us know in the comments!

Erin & Skye

Sunday 7 September 2014

Personal Planner Giveaway - The Winners!


Thank you to everyone who entered our Personal Planner giveaway; we've been overwhelmed with the entries and have loved reading your top tips on staying organised.

Congratulations to our two winners!

Gift Voucher for 1 x Personal Planner - Claire Wood

Gift Voucher for 1 x Wall Planner - Heather Knotts

If you could please pop us an email, we will put you in touch with Personal Planner to arrange your prizes :)

Erin & Skye


Friday 5 September 2014

Craft Favourite: Mod Podge

mod podge craft favourite eightandsixteen

For my first Craft Favourite feature I wanted to talk about one of the most versatile and useful supplies in my collection; Mod Podge! Now much more readily available in the UK (stockists include Hobbycraft) if you haven’t already tried it now is the time!

It may look like a basic PVA glue but it can also be used as a sealant and to give a certain finish to your project. There are many different types available (some within the UK, others can be ordered online) including sparkle, paper, fabric, dishwasher safe, outdoor and more. The three currently in my collection are basics Glossy & Matte as well as 3D Dimensional Magic which is perfect for jewellery projects!

If you’re looking for ideas of projects Mod Podge is perfect for here’s a few examples from my DIY archives:
For more Mod Podge project ideas and inspiration visit Mod Podge Rocks!

Do you have a crafty product that you can't live without? We'd love to hear about it!

Erin

Thursday 4 September 2014

We Want To Feature Your Creations!

reader submissions

Back when we published our first post we mentioned how we had dreams of Eight & Sixteen becoming not just a blog but a crafty community. We wanted to make this little corner of the internet a place where we will not only share our projects but those made by our readers as well. Of course we'd be honoured if any of your projects were inspired by ours but equally we would love to be inspired by the work of our talented & creative readers.

We'd love to make reader submission posts a regular feature here at E&S so if you've got a crafty project you would like us to showcase please get in contact - we would love to hear from you!

All you need to do is email or tweet us a photo of your creation, include a little bit of information on the project as well if you'd like to, and you may be featured in a future post!

Skye & Erin

Wednesday 3 September 2014

DIY Camera Strap Cover


If you're using your camera for long periods of time, a comfortable strap is a must. I wanted to create a strap cover that could be easily removed, but that would add some padding around the neck for support. This is also a great project for using up fabric scraps as well as a simple introduction to quilting.


Lay out your camera strap and measure it to decide how long you want your cover to be (for reference, before sewing my strap pieces measured 70cm x 8cm).
As I used lots of fabric scraps for the top of my strap, I simply laid them out alongside the strap and kept adding until they were long enough and then sewed them together - experiment with layouts until you're happy with the design.
You will also need a strip of fabric for the underside of your strap, and two pieces of interfacing.
Take your top strap fabric piece and one of the interfacing pieces and pin together. Using a ruler and a fabric marker, draw on diagonal lines across the whole strap.
Sew along all of these lines, and then repeat with the other strip of interfacing and underside fabric.


With both strips now quilted, turn all short edges under 1cm and press, then stitch into place.
Take both strips and pin them right sides together, and then sew along both long edges with a 1cm seam allowance.
Turn the strap through (you may need to use a wooden spoon or something similar!) and give it a good iron, then slide it onto your camera strap and you're all done!


We'd love to hear from you if you give this DIY a go - use the hash tag #eightandsixteen to share your photos with us!

Skye


Monday 1 September 2014

Kit Review: Hobbycraft Felt Purse

hobbycraft kit review felt coin purse citrus fruit orange

Having admired the cute range of designs in store many times in the past I recently picked up one of Hobbycraft’s felt kits. The range, designed for kids, has some lovely projects including the bold orange slice purse I’m sharing with you today.

hobbycraft kit review felt coin purse citrus fruit orange hobbycraft kit review felt coin purse citrus fruit orange

The kit came with all of the felt pieces needed to create the purse plus threads, a plastic needle and step-by-step instructions. The felt pieces had all been pre-cut with punched holes for sewing as well as the zip already attached the main body of the purse so, if you’re a beginner there’s no need to worry about any fiddly tasks! The instructions included simple diagrams of how to do the different types of stitch needed, again something that’s great for beginners.

I had a lot of fun making up the purse and I think it would make a great rainy day activity for both kids and adults!

You can find the Orange Purse Kit online for £5, or if you’re lucky and can find one in store you can pick it up on sale for just £2.50 like I did!

hobbycraft kit review felt coin purse citrus fruit orange

Have you tried any Hobbycraft kits? We'd love to hear what you think so don't forget to leave a comment or tweet us using the hashtag #eightandsixteen 

Erin
 
Related Posts Plugin for WordPress, Blogger...